In today’s security-conscious environment, distributing your Excel applications compiled with XLS Padlock requires more than just functionality—it demands trust. Unsigned executable files are frequently met with intimidating warnings from operating systems like Windows Defender SmartScreen, potentially deterring users and undermining the credibility of your work.
This guide provides a step-by-step tutorial for developers using XLS Padlock to digitally sign their protected Excel applications with Microsoft’s cheap Azure Trusted Signing service. By doing so, you provide users with confidence that your application is authentic and has not been tampered with.
Note that XLS Padlock can also digitally sign your EXE files with other means than Azure Trusted Signing.
Moreover, if you have no code signing certificate at all, you can still choose the EXE + application XPLAPP Bundle format in XLS Padlock. Thus, your Excel app is still signed and recognized by SmartScreen as secure.
In this article, let’s delve into Azure Trusted Signing.
1. The Essentials: Prerequisites for Signing
Before we configure XLS Padlock, it’s vital to have your Azure environment and local tools ready. This foundational work ensures a smooth integration and prevents common errors.
Your Azure Trusted Signing Setup
This process assumes you have a fully configured Azure Trusted Signing environment. This is the most crucial prerequisite and involves three key components in your Azure portal:
- Trusted Signing Account: This is your central hub in Azure for managing certificate profiles. Its name must be globally unique.
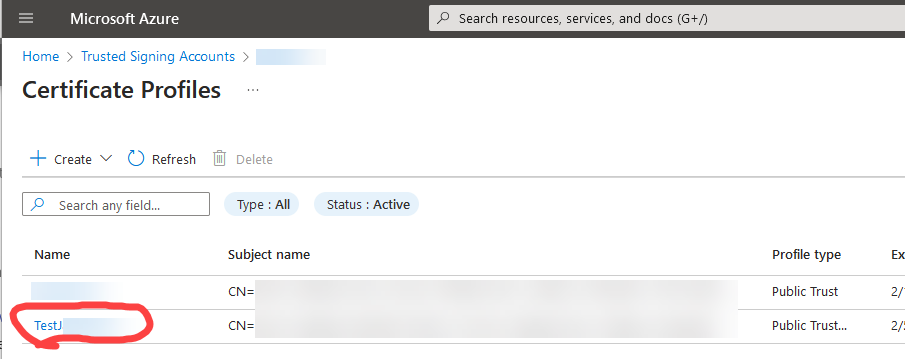
- Certificate Profile: Created within your account, this profile defines the certificate’s properties. For software distributed to the public, you’ll use a “Public Trust” profile.
- Identity Validation: For Public Trust certificates, Azure requires a thorough validation of your or your organization’s legal identity. This process is essential for establishing the trustworthiness of your signature and can take some time to complete.
Setting up these Azure resources is a detailed process. Please refer to our dedicated tutorial on how to set up an Azure Trusted Signing account before proceeding.
Required Local Tools ⚙️
You’ll need three key pieces of software installed on your development machine to connect XLS Padlock to Azure’s cloud-based service.
- Microsoft Azure CLI: The Azure Command-Line Interface (CLI) is the bridge that authenticates your computer with your Azure account. The
az logincommand is central to this process.- Action: Download and install the Azure CLI from Microsoft’s official page.
- Microsoft Trusted Signing Client Tools: This package provides the necessary library (
Azure.CodeSigning.Dlib.dll) that allows traditional signing tools to communicate with the Azure cloud service.- Action: Download and install the Trusted Signing Client Tools. They are typically installed in a directory like
C:\Users\YOUR_LOGIN\AppData\Local\Microsoft\MicrosoftTrustedSigningClientTools\.
- Action: Download and install the Trusted Signing Client Tools. They are typically installed in a directory like
- SignTool.exe: This is Microsoft’s standard command-line utility for applying digital signatures to files. It’s included with the Windows SDK.
- Action: Download the latest Windows SDK. During installation, you must select the “Windows SDK Signing Tools for Desktop Apps” component. A common path for the tool is
C:\Program Files (x86)\Windows Kits\10\bin\SDK_VERSION\x64\signtool.exe.
- Action: Download the latest Windows SDK. During installation, you must select the “Windows SDK Signing Tools for Desktop Apps” component. A common path for the tool is
💡XLS Padlock checks for the presence of these tools, so proper installation is the first step to success.
2. Configuring XLS Padlock for Azure Signing
With the groundwork laid, you can now instruct XLS Padlock on how to use these tools and connect to your Azure account.
A. Set Tool Paths in XLS Padlock Options
First, you must tell XLS Padlock where to find SignTool.exe and the Azure Dlib extension.
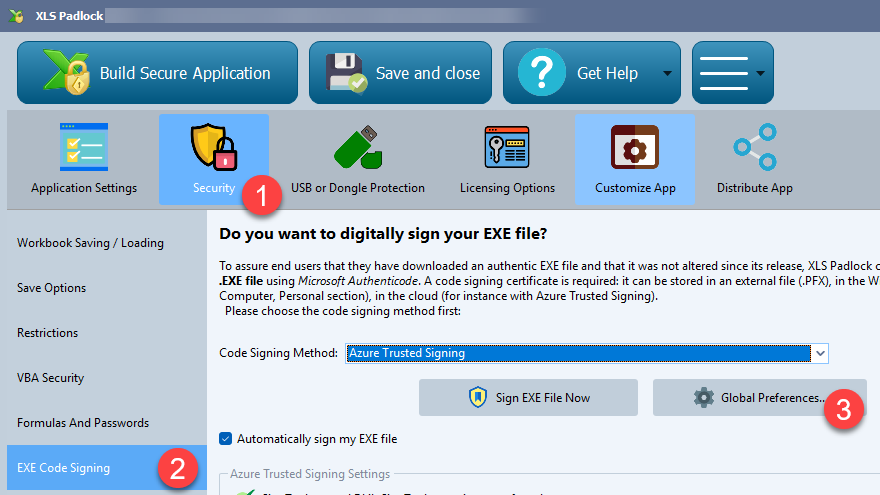
- Open XLS Padlock and navigate to the Security page. Go to EXE Code Signing.
- Haga clic en el Global Preferences button.
- Enter the full file paths for
SignTool.exeyAzure.CodeSigning.Dlib.dllbased on where you installed them in the previous step. For example:- SignTool.exe Path:
C:\Program Files (x86)\Windows Kits\10\bin\10.0.22621.0\x64\signtool.exe(adjust the version number as needed). - Azure.CodeSigning.Dlib.dll Path:
C:\Users\YOUR_LOGIN\AppData\Local\Microsoft\MicrosoftTrustedSigningClientTools\Azure.CodeSigning.Dlib.dll(replaceYOUR_LOGINwith your Windows username).
- SignTool.exe Path:
- Validate with Cerrar.

B. Enable Azure Trusted Signing for Your Application
In the XLS Padlock main window, on the Security tab, then EXE Code Signing.
- From the dropdown menu, choose “Use Azure Trusted Signing”.
- Optionally, check the box to “automatically sign my EXE file”.
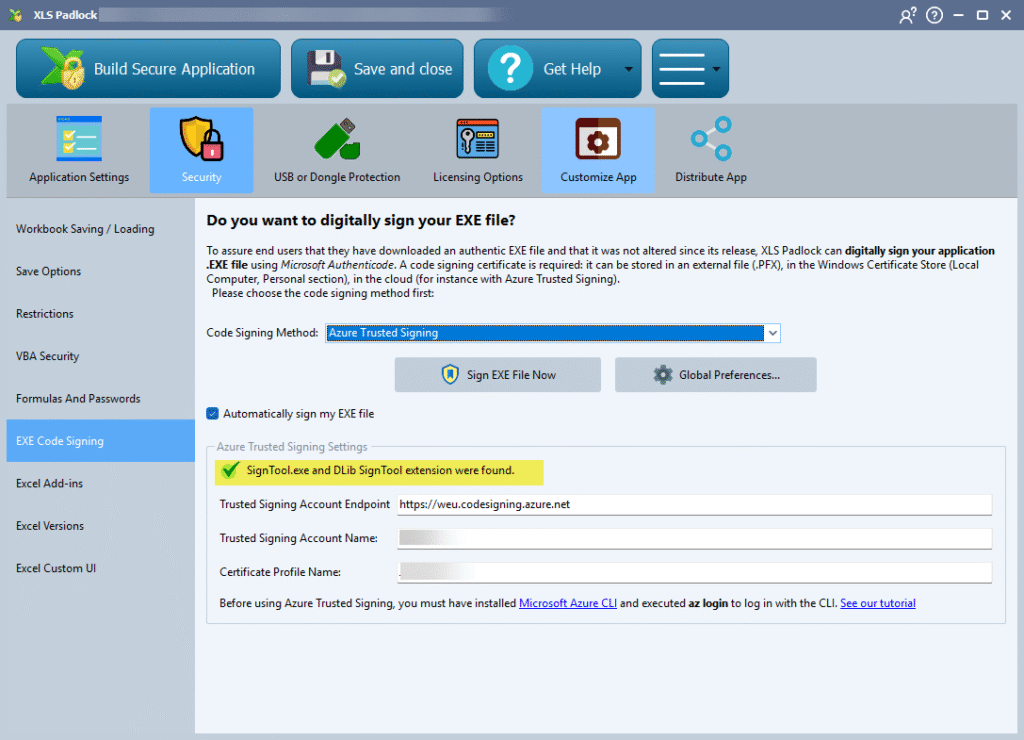
At this stage, XLS Padlock will use the paths you just configured to check for the required tools. You should see a confirmation message, like a green checkmark ✅, indicating that SignTool.exe and the Dlib extension were found. If you see an error, double-check your installation and the paths you entered in the Global Preferences.
C. Enter Your Azure Account Details 🔑
The final configuration step is to provide your specific Azure Trusted Signing credentials. These fields connect XLS Padlock directly to your certificate profile.
- Trusted Signing Account Endpoint: This is the region-specific URL for your Azure Trusted Signing service. You can find this URL on the overview page of your Trusted Signing Account in the Azure portal. It’s crucial to use the correct regional endpoint.
- Trusted Signing Account Name: This is the unique name you gave your Trusted Signing Account when you created it in Azure.
- Certificate Profile Name: This is the name of the specific certificate profile (e.g.,
MyPublicTrustProfile) you intend to use for signing your XLS Padlock applications.
ℹ️ Accurately filling in these three fields is essential for the signing operation to succeed.
3. The Final Steps: Authenticate and Compile
With the configuration complete, the process of signing your application is now beautifully streamlined.
A. Authenticate Your Session with az login
Before compiling, you must authenticate your current command-line session with Azure. This is not a one-time step. Authentication tokens expire, so you’ll need to do this periodically.
- Open a command-line tool like Windows Terminal, PowerShell, or Command Prompt.
- Run the command:
az login - This command will launch your default web browser, asking you to log in to the Microsoft account associated with your Azure Trusted Signing subscription.
- Once you successfully log in, you can close the browser tab. Your command-line session is now authenticated.
XLS Padlock relies on this active session to perform the signing. If the signing process fails with an authentication error, the first thing to check is whether you need to re-run az login.
B. Compile and Sign Your Workbook
This is the easy part! XLS Padlock handles all the complex command-line work for you.
- Ensure you have completed all the configuration steps and have an active Azure session from
az login. - In XLS Padlock, compile your protected workbook into an
.EXEapplication as you normally would.
Behind the scenes, XLS Padlock will automatically call SignTool.exe, passing the necessary parameters from the UI and using the Azure Dlib extension to communicate with the cloud service.
👉 The resulting .EXE file will be digitally signed with your trusted certificate.
Verify Your Signature: After compiling, right-click your new .EXE file, select Properties, and go to the Digital Signatures tab. You should see your signature listed. This is the ultimate confirmation that the process worked.
4. Troubleshooting and Best Practices
If you encounter issues, here are some common problems and their solutions.
XLS Padlock stores signing errors in the compilation log (in the same folder as your Excel workbook source file).
Common Problems
- “SignTool.exe or Dlib not found” Error: This means the paths in XLS Padlock’s options are incorrect or the tools aren’t installed properly. Revisit Section 1 to verify installations and Section 2.A to confirm the paths are correct.
- Authentication or Access Denied Errors: This is the most frequent issue.
- Make sure you ran
az loginsuccessfully before trying to compile. - Confirm you logged in with the Azure account that has the “Trusted Signing Certificate Profile Signer” role assigned for the certificate profile you are using. This permission is mandatory.
- Check that your Azure subscription is active.
- Make sure you ran
- Incorrect Endpoint, Account, or Profile Name: A simple typo in these fields will cause the connection to fail. Carefully compare the values entered in the XLS Padlock UI with the actual values in your Azure portal. Remember to use the correct regional endpoint URL.
- Identity Validation Incomplete: Your certificate profile cannot be used for signing until the linked identity validation is approved by Microsoft. Check its status in the Azure portal.
- Firewall or Proxy Blocks: If you’re on a corporate network, a firewall might be blocking the connection to
*.codesigning.azure.net. Ensure that outbound HTTPS traffic on port 443 is allowed to this endpoint.
Best Practices for Success
- Always
az login: Make it a habit to runaz loginbefore a signing session, especially if it’s been a while. - Keep Tools Updated: Periodically check for new versions of the Azure CLI, Trusted Signing Client Tools, and the Windows SDK.