Installer + file association
An installer that makes your save files open with a double-click.
XLS Padlock compiles your workbook into a secure EXE, and you can let customers save their changes to encrypted save files. This tutorial builds a Windows installer with Paquet Builder and registers your own save-file extension, so a customer can double-click a save file and it opens straight in Excel: no compiled-workbook shortcut, no prompt.
Before you start. You need Paquet Builder, the installer maker XLS Padlock hands the Setup project to. Install it alongside XLS Padlock.
What you will set up.
Three pieces work together so a save file behaves like a native document for your customer.
- A custom save extension
- Encrypted save files carry your own extension (.MBX in this tutorial) instead of the default .XLSC.
- A one-file installer
- Paquet Builder wraps the compiled workbook into a single Windows installer with a desktop shortcut and a clean uninstall.
- A file association
- Double-clicking a save file launches your compiled workbook in Excel and loads the file, with no shortcut needed.
Six phases, start to finish.
From the save extension in XLS Padlock to a tested installer, here is the path the tutorial walks.
- 01 Phase
Configure the workbook in XLS Padlock
Choose your save-file extension and rebuild the secure application.
- 02 Phase
Generate the Setup project
From XLS Padlock, create the installer project that opens in Paquet Builder.
- 03 Phase
Set up the package in Paquet Builder
Add your company details and confirm the compiled workbook and install folder.
- 04 Phase
Add the file-association action
Register the action that ties your extension to the compiled workbook.
- 05 Phase
Edit the association actions
Point the generated actions at your own extension and edit each one.
- 06 Phase
Build, install, and test
Compile the installer, run it, and confirm a save file opens with a double-click.
Step by step.
Twenty-five steps, grouped into the six phases above. Every screenshot is the real XLS Padlock or Paquet Builder window.
Click any screenshot to enlarge it.
Configure the workbook in XLS Padlock
Choose your save-file extension and rebuild the secure application.
- 1
Pick the extension for your save files
For this tutorial we use .MBX. Enter it in the save-file extension field (or any extension you want for your own workbook).
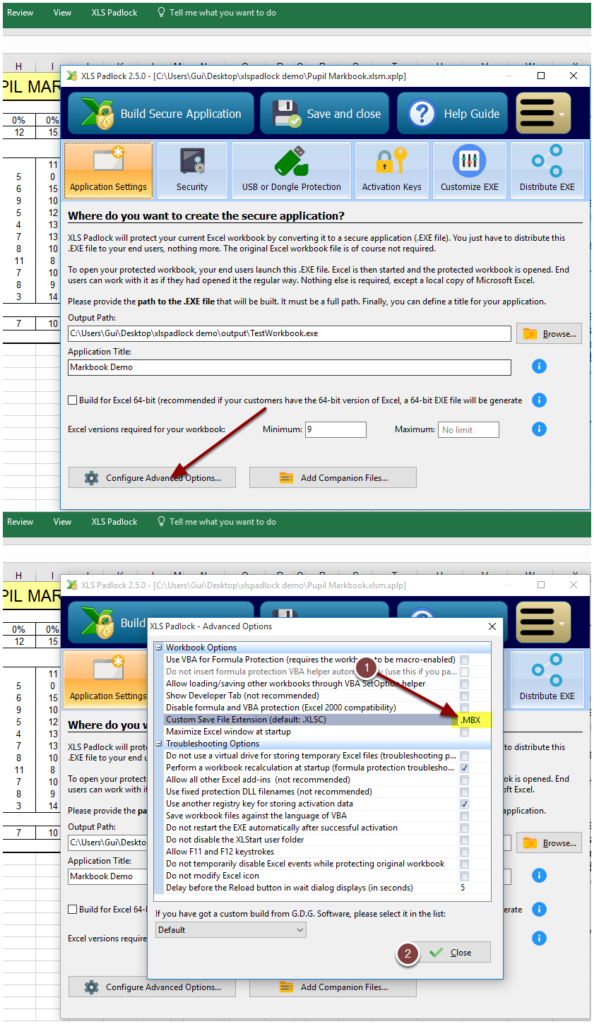
Pick the extension for your save files Requires Save enabled. A custom save extension only applies if you let customers save changes in XLS Padlock. See Save options
- 2
Rebuild the secure application
Build the compiled workbook again so the new extension takes effect.
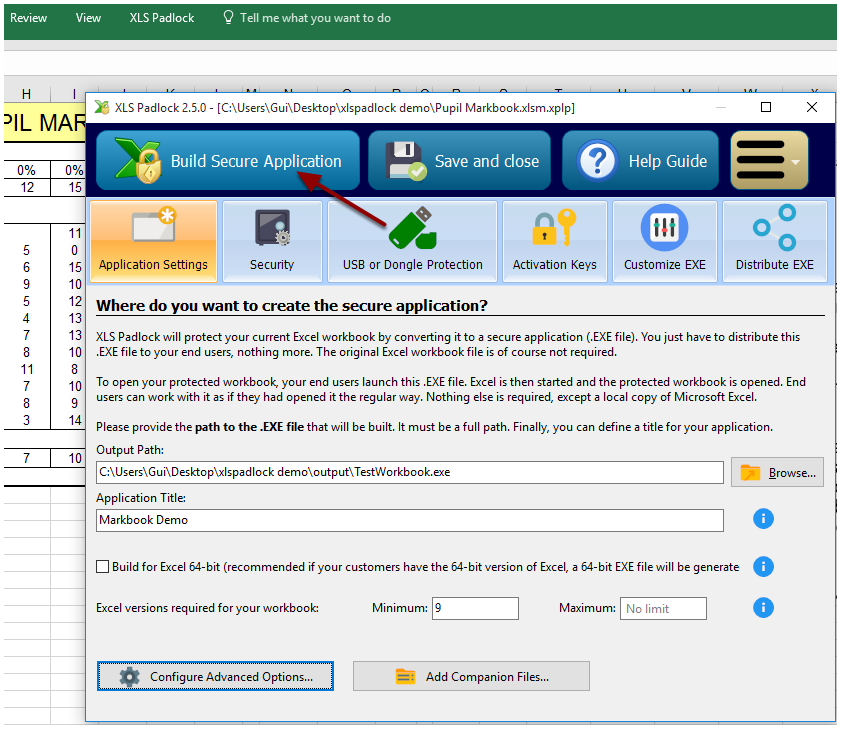
Rebuild the secure application
Generate the Setup project
From XLS Padlock, create the installer project that opens in Paquet Builder.
- 3
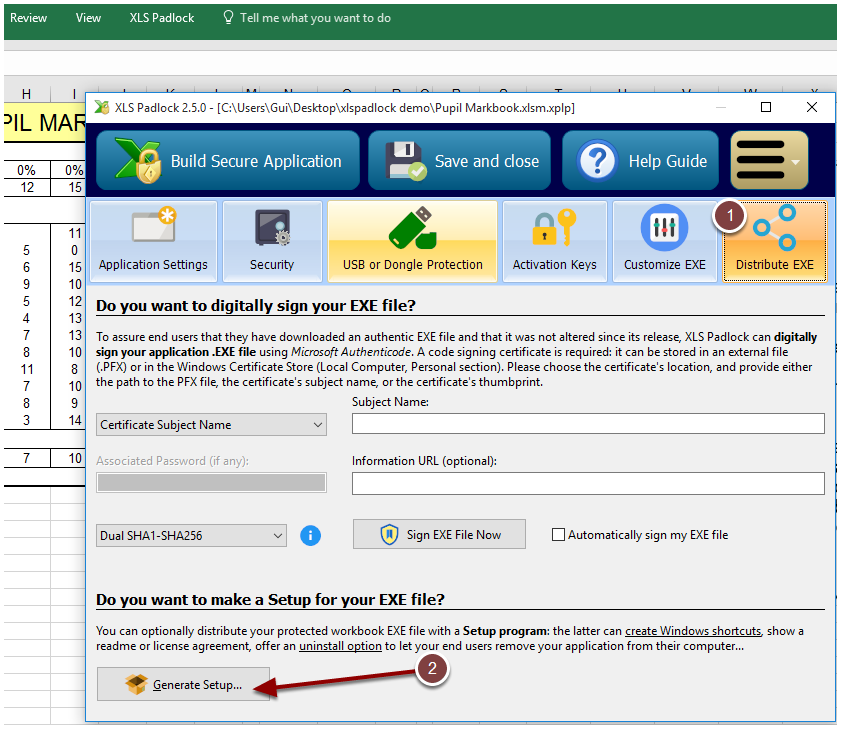
Open Distribute EXE, then click Generate Setup
In XLS Padlock, open the Distribute EXE tab (shown at the top of this page) and click Generate Setup.
- 4
Fill in your workbook details, then Generate Setup
Enter the destination path, Setup title, and application name, then press Generate Setup.
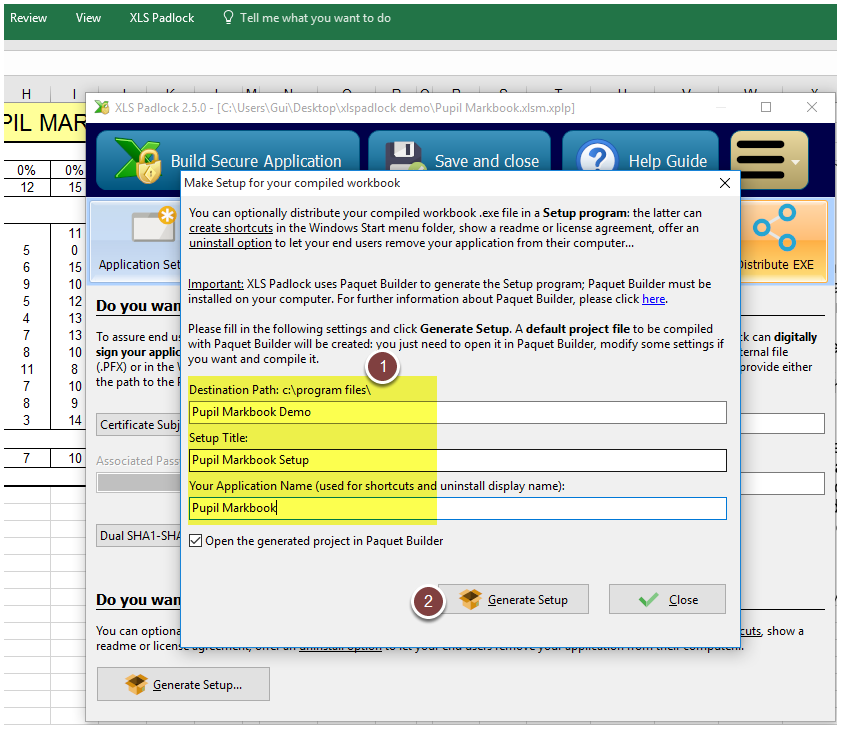
Fill in your workbook details, then Generate Setup - 5
Choose a filename for the project and save it
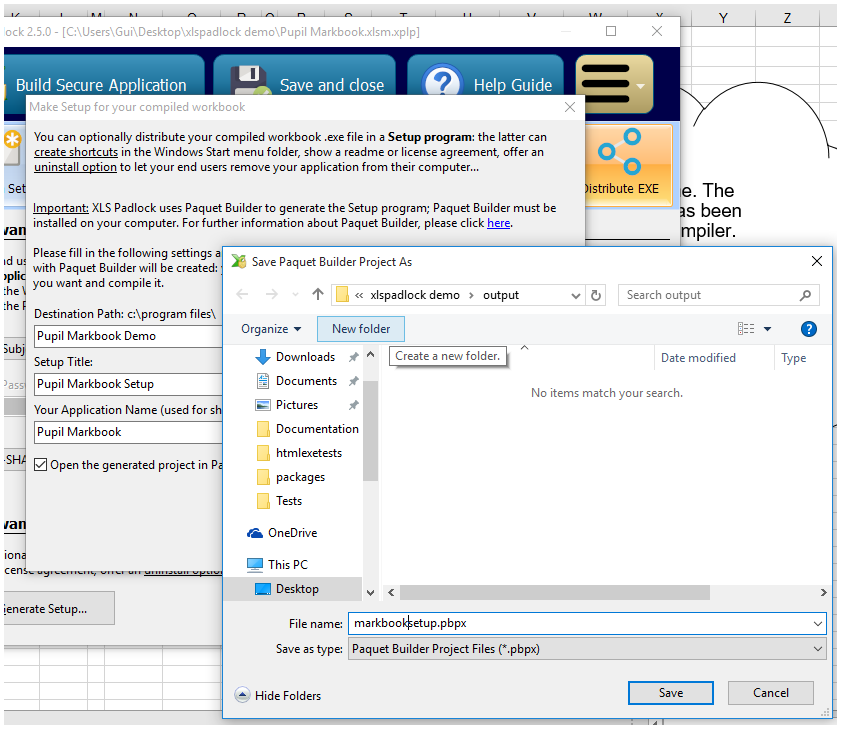
Choose a filename for the project and save it - 6
Confirm; Paquet Builder opens with the project
Click OK. XLS Padlock launches Paquet Builder with the generated installer project.
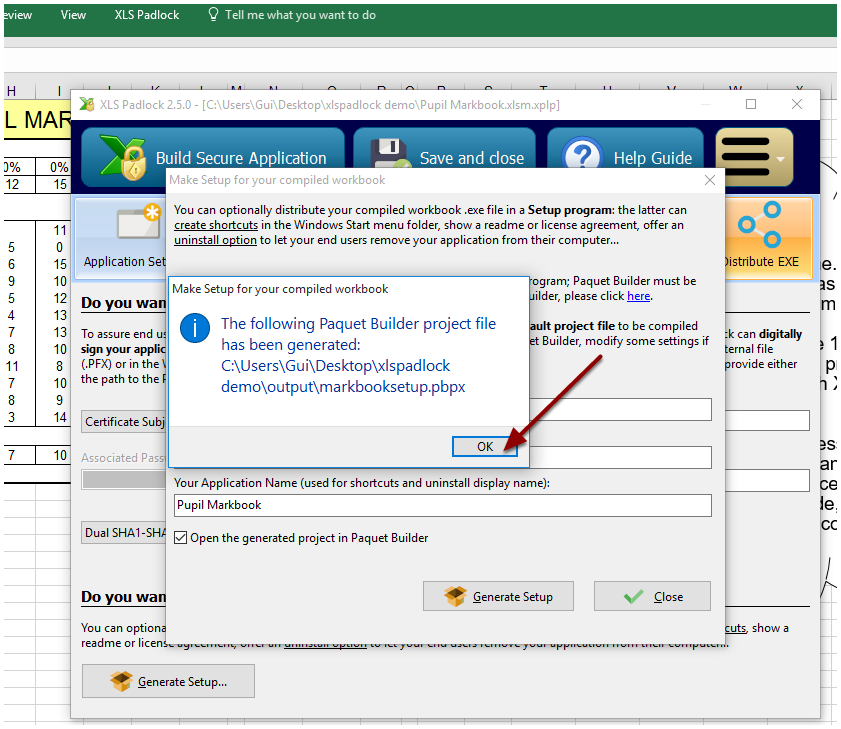
Confirm; Paquet Builder opens with the project
Set up the package in Paquet Builder
Add your company details and confirm the compiled workbook and install folder.
- 7
Enter your company information, then open File Manager
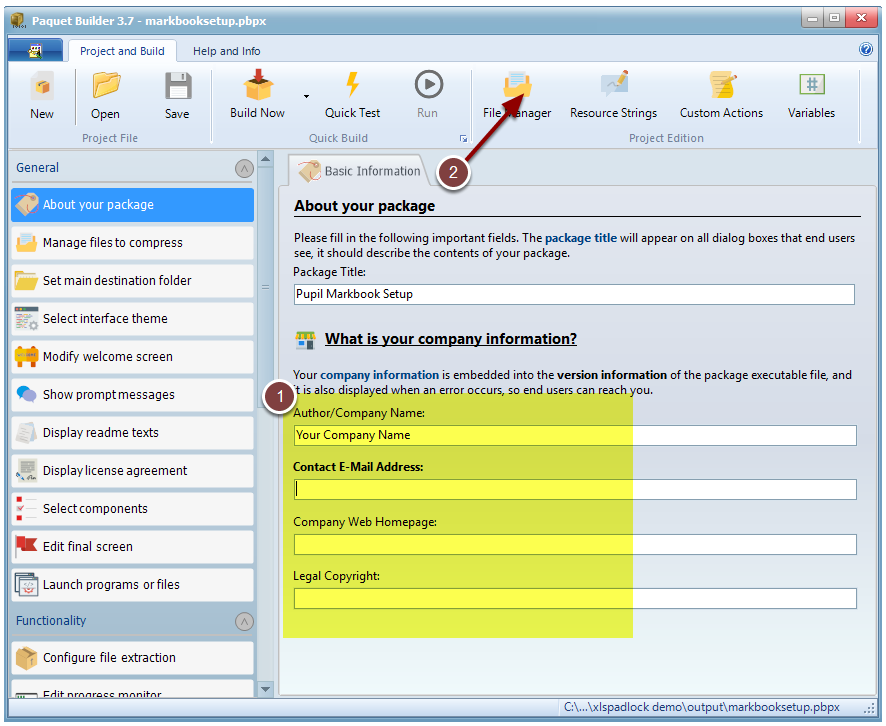
Enter your company information, then open File Manager - 8
Confirm your compiled workbook is listed
TestWorkbook.exe appears, so the installer will compress and install it. Close the File Manager.
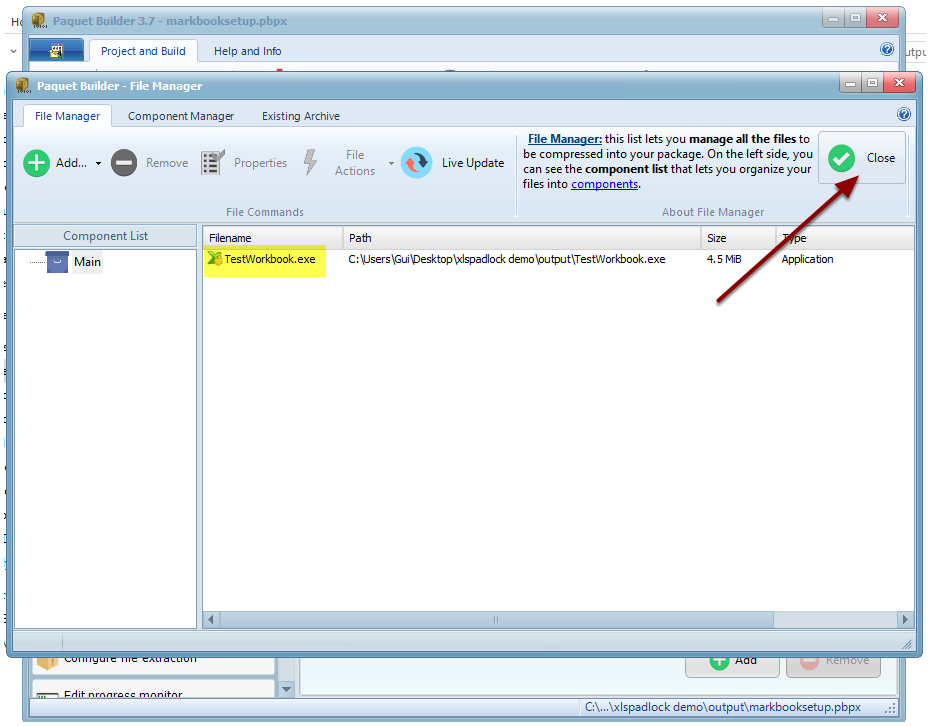
Confirm your compiled workbook is listed - 9
Check the destination folder
Change it if you do not want the default.
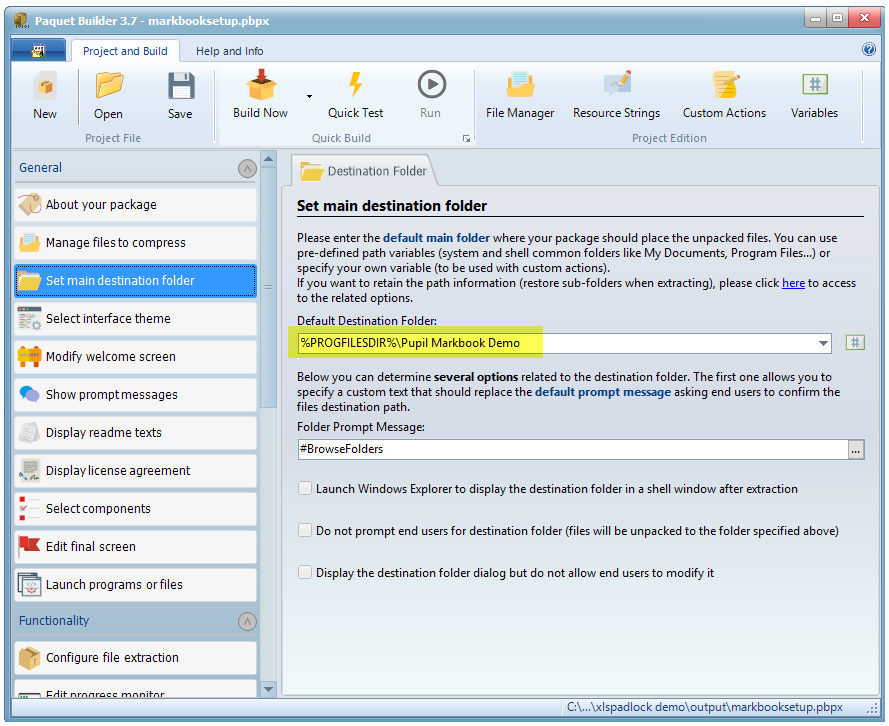
Check the destination folder Where it installs. %PROGFILESDIR% is the standard Program Files directory, so %PROGFILESDIR%\Pupil Markbook Demo installs to C:\Program Files (x86)\Pupil Markbook Demo. On Windows, applications belong in Program Files.
Add the file-association action
Register the action that ties your extension to the compiled workbook.
- 10
Open Custom Actions, After File Extraction, Action Templates
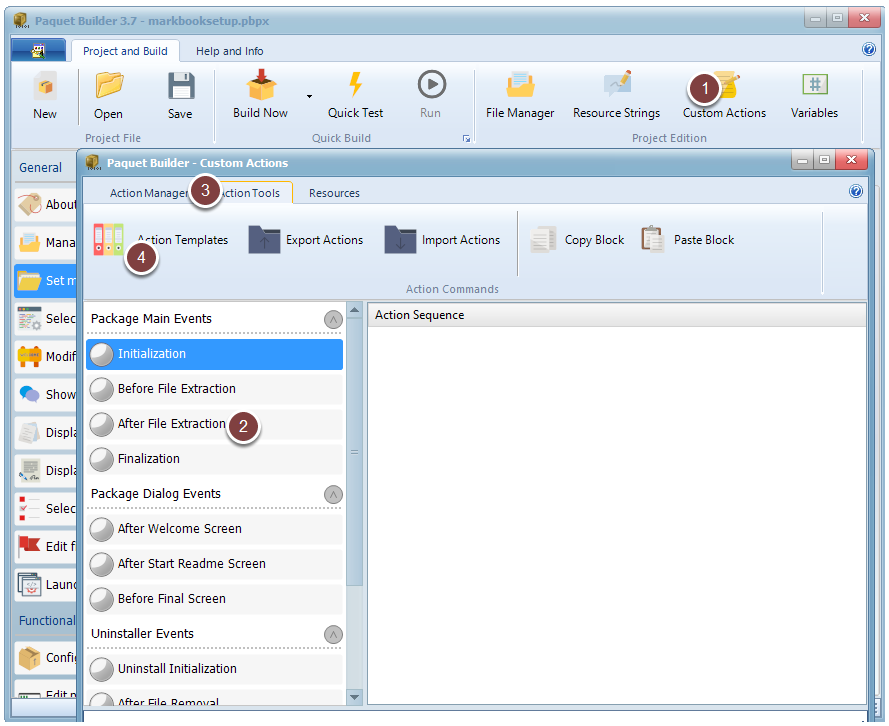
Open Custom Actions, After File Extraction, Action Templates - 11
Add Register File Association and click OK
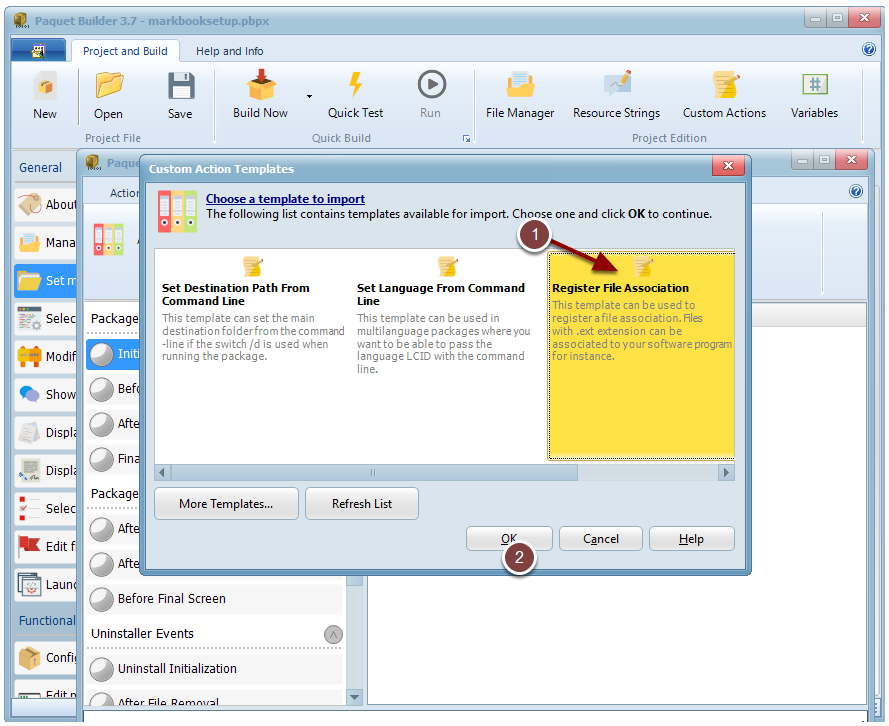
Add Register File Association and click OK
Edit the association actions
Point the generated actions at your own extension and edit each one.
- 12
Change every .ext to your extension (.mbx)
Paquet Builder creates several custom actions for the association. First, replace every .ext with the extension you chose at the start.
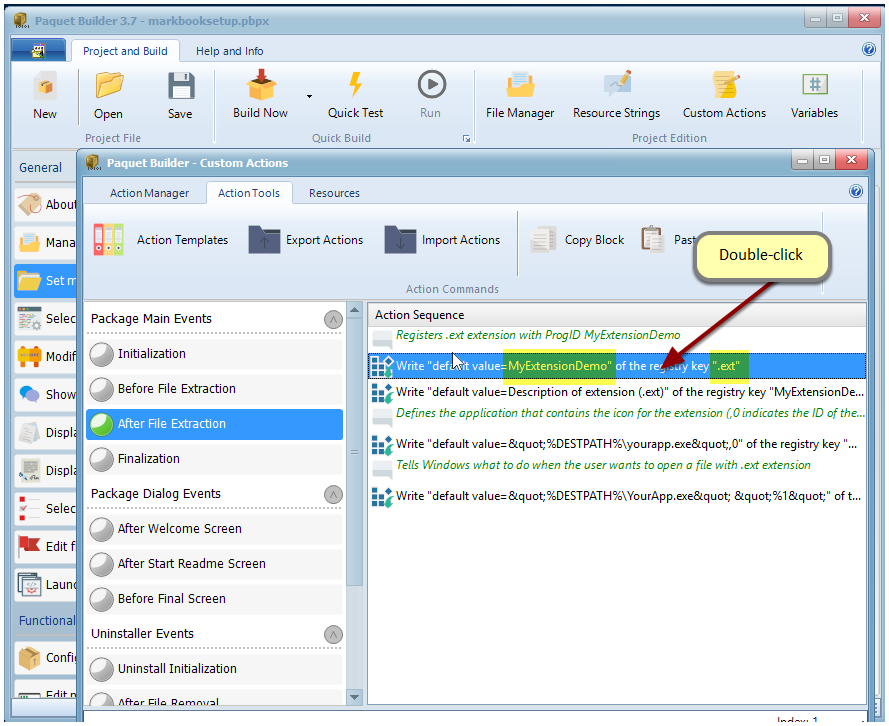
Change every .ext to your extension (.mbx) - 13
Edit the first action: two entries to modify
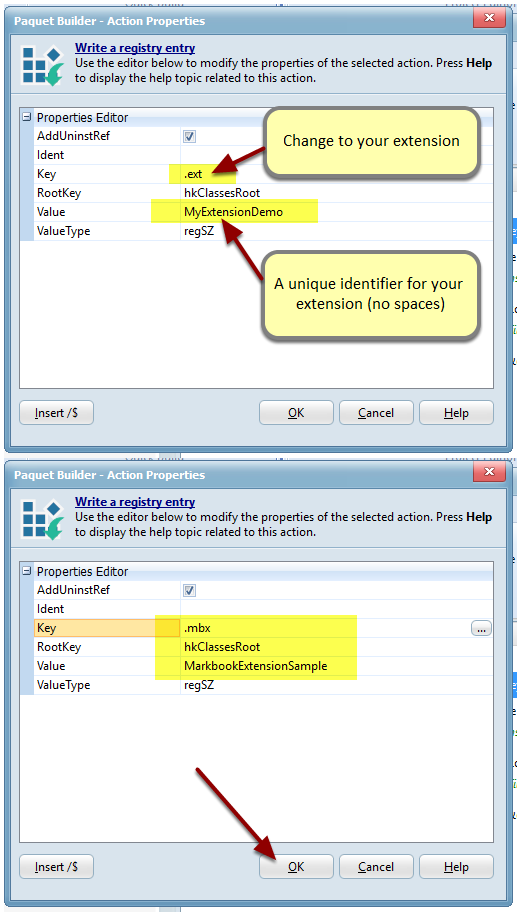
Edit the first action: two entries to modify - 14
Edit the second action: the file description
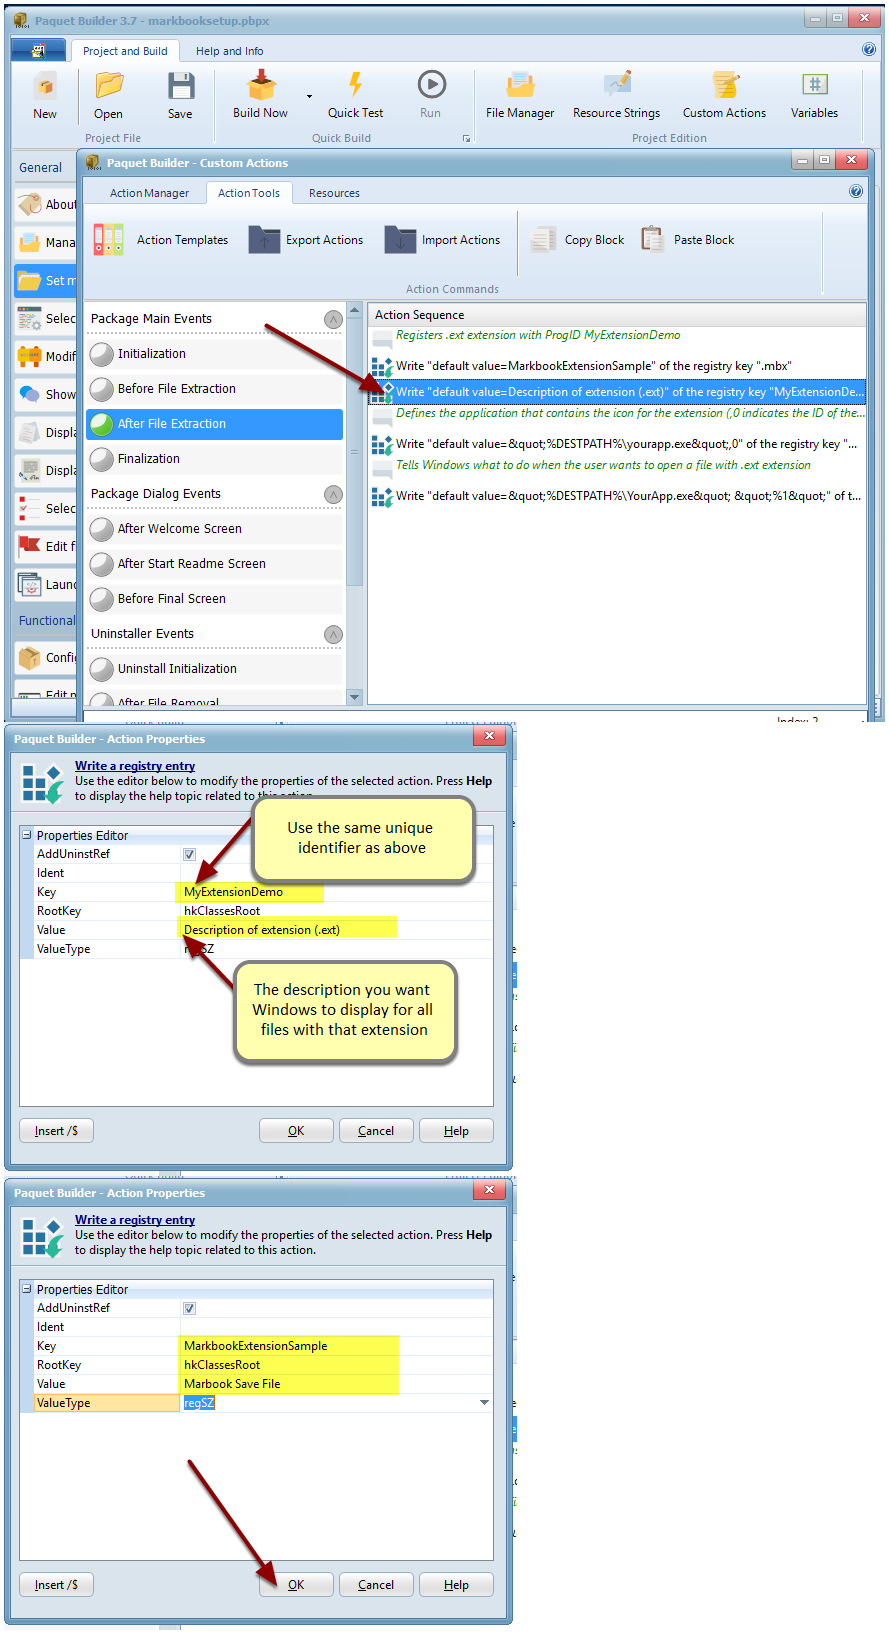
Edit the second action: the file description - 15
Edit the third action
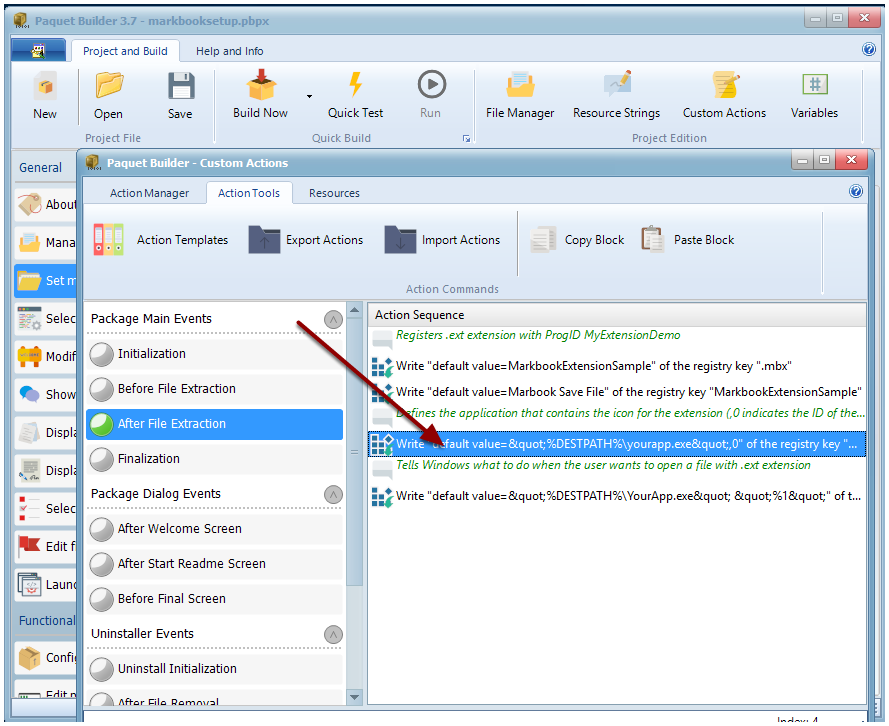
Edit the third action - 16
Configure the action exactly as shown
The screenshot annotates every value to set. Click it to read the full settings at full size.
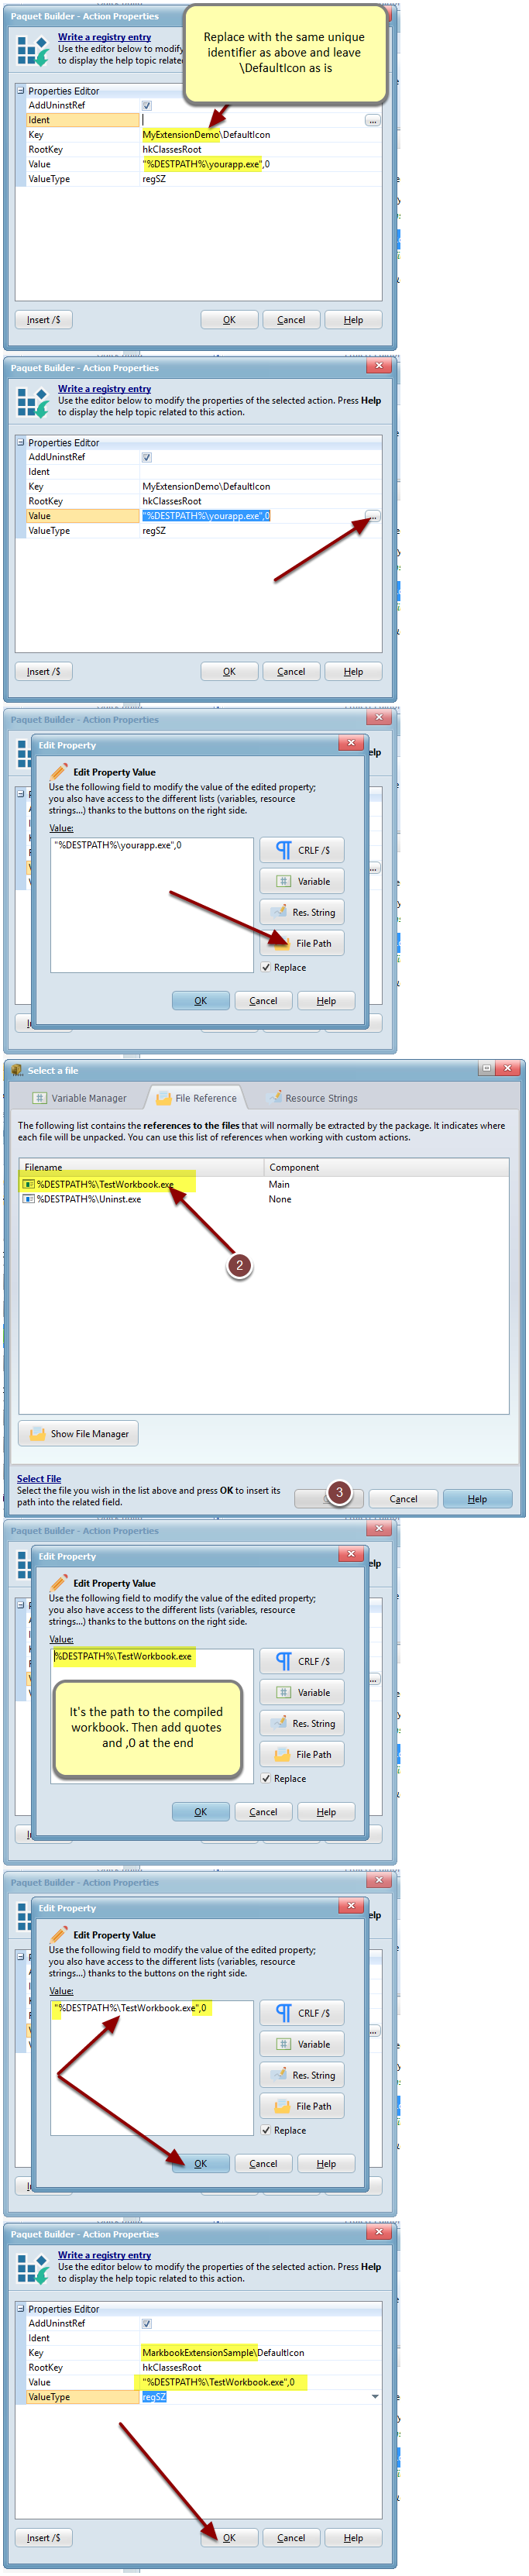
Configure the action exactly as shown - 17
Edit the last action the same way
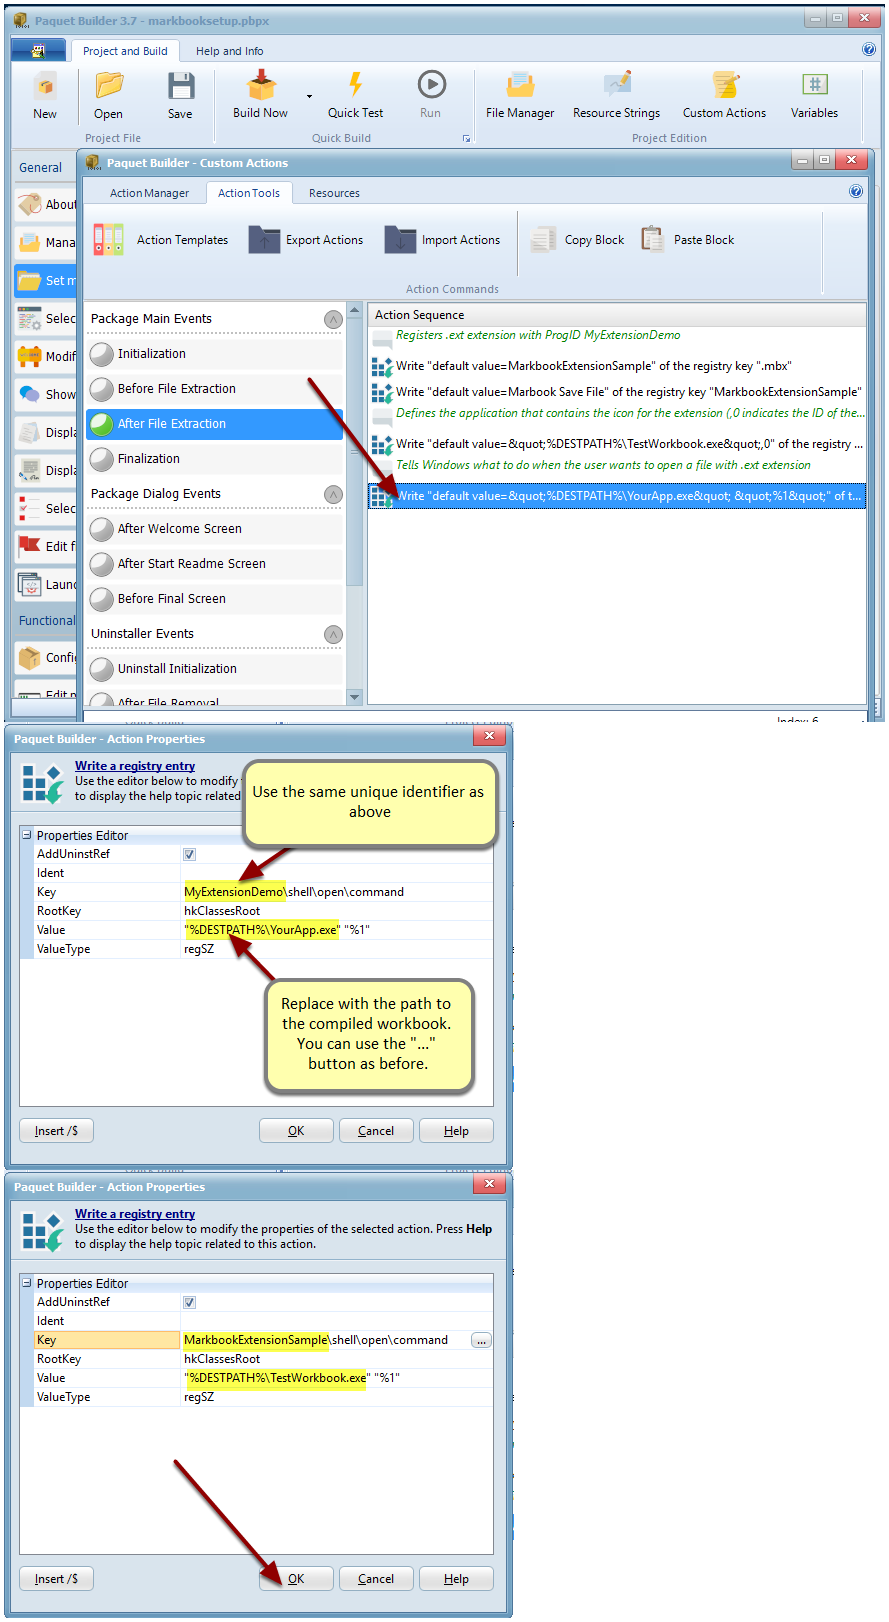
Edit the last action the same way Keep it exact. Do not change any other characters when you replace values. The final %1 in particular is mandatory: it passes the double-clicked file to your workbook.
- 18
Close the Custom Action editor
Your four actions now register the association for your extension.
Build, install, and test
Compile the installer, run it, and confirm a save file opens with a double-click.
- 19
Build the installer with Build Now
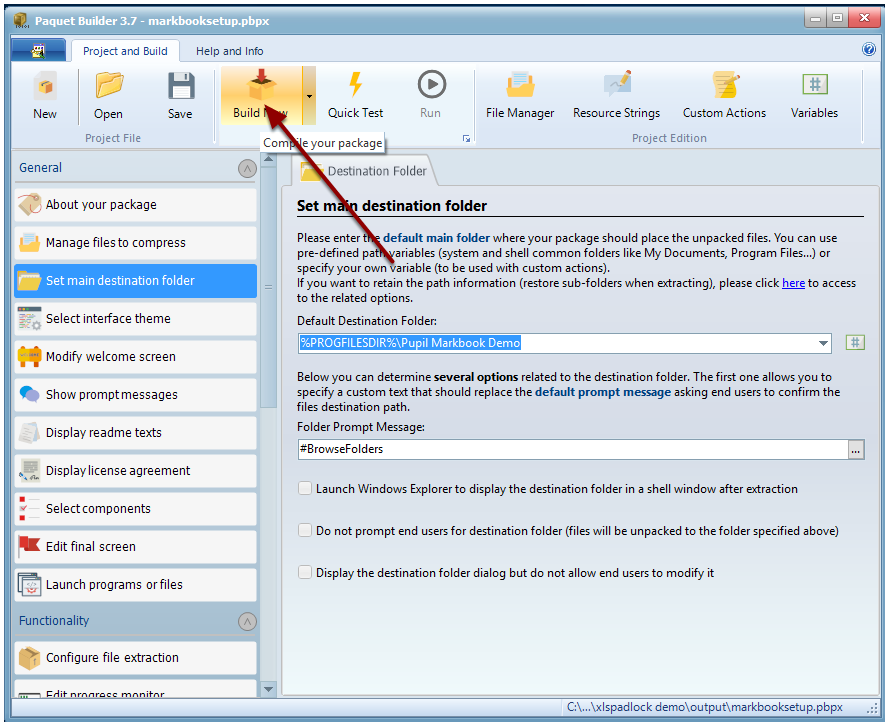
Build the installer with Build Now - 20
Run your new installer
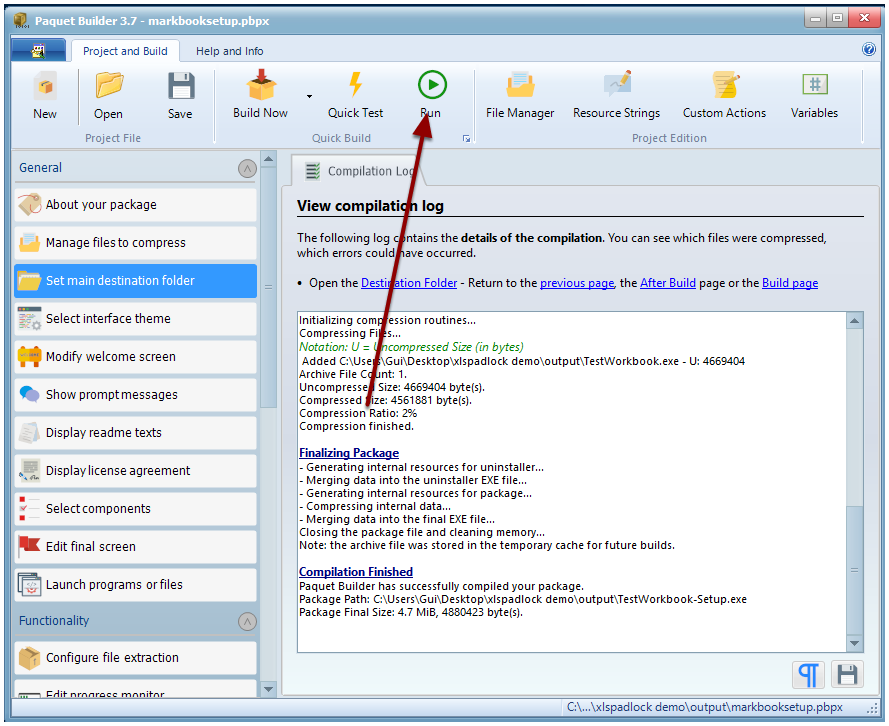
Run your new installer - 21
Approve the elevation prompt
Windows asks for elevated rights because you are installing an application. That is expected.
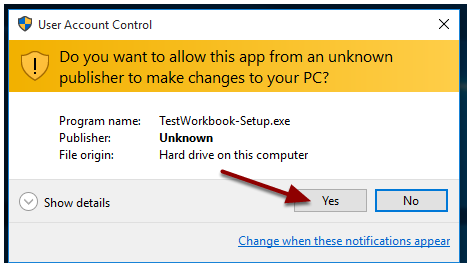
Approve the elevation prompt Unsigned for now. Unknown publisher shows because this package is not code-signed. You can sign it; see the Paquet Builder documentation.
- 22
Finish setup; a desktop shortcut is created
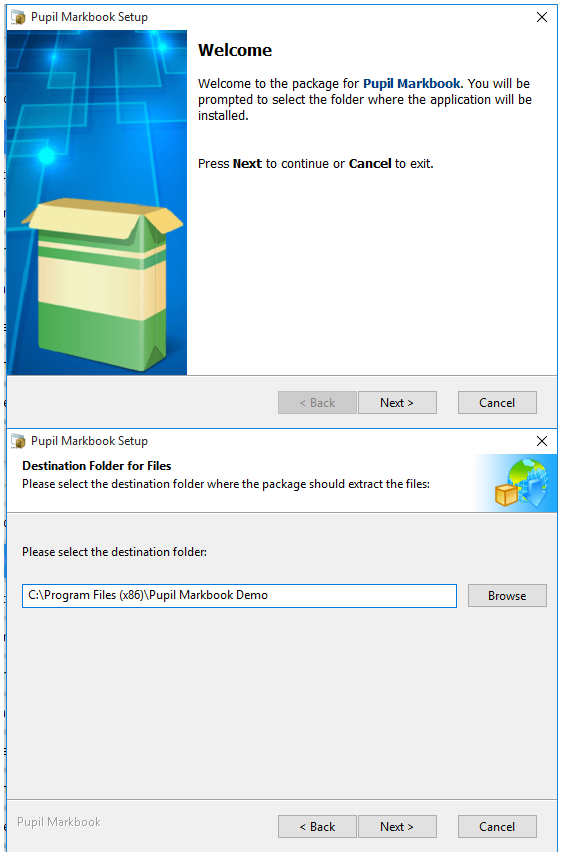
Finish setup; a desktop shortcut is created - 23
Open the workbook and Save to create an encrypted save file
The secure workbook opens in Excel. Click Save and choose a filename for the save file.
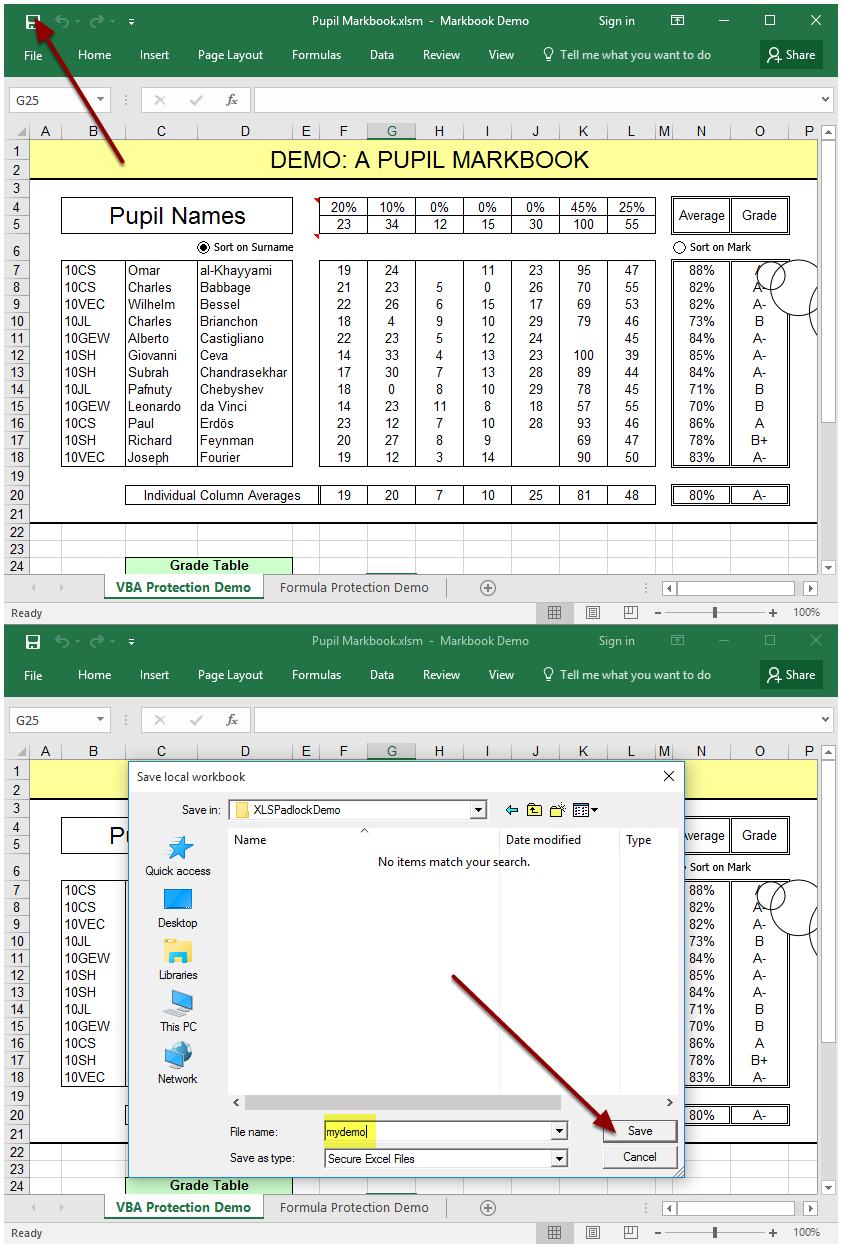
Open the workbook and Save to create an encrypted save file - 24
Check the save file's extension and type
In the folder, the save file carries your custom .MBX extension and the type you defined, Markbook Save File.
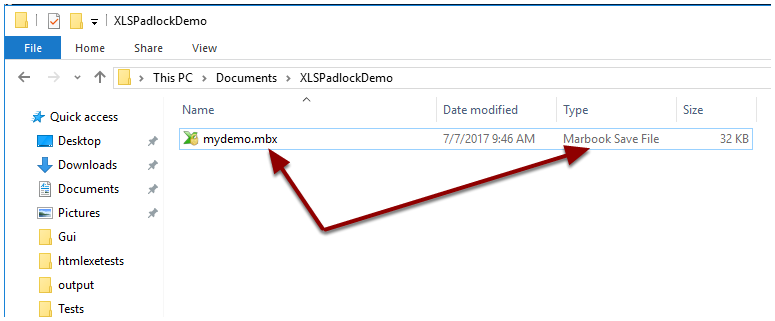
Check the save file's extension and type - 25
Double-click the save file: Excel opens it directly
Excel starts and loads the save file. No need to use the compiled workbook's shortcut.
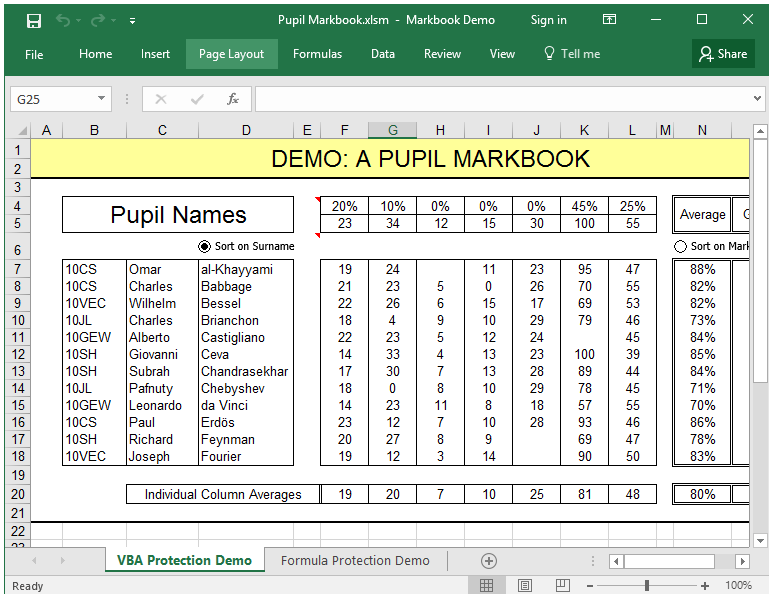
Double-click the save file: Excel opens it directly
That is the whole flow. Your customers install the workbook from one installer, and their save files open in Excel with a double-click.
Learn more about Paquet BuilderYou stay in control.
XLS Padlock is a one-time purchase, not a middleman between you and your buyers. Everything the protection depends on stays yours.
Shipping since 2013 from G.D.G. Software. A desktop tool you can build a business on.
- The workbook
- Your .xlsx never leaves your machine. You compile it yourself into a standalone EXE.
- The keys
- You generate, count, and revoke activation keys. No per-copy fee, no royalties on your sales.
- The server
- Activations validate against a PHP server you host and own, not ours.
- The customer
- You sell directly. The buyer relationship and the full revenue stay with you.