Configuration du produit d-abonnement dans workbooks.json
Les étapes ci-dessous concernent les produits d-abonnement.
- Modifiez le fichier workbooks.json stocké sur votre serveur.
- Si ce n-est pas déjà fait, accédez à la WooCommerce admin page (page d-administration de WooCommerce) et créez le produit d-abonnement qui sera associé à votre classeur. Si vous ne savez pas comment procéder, veuillez consulter la documentation WooCommerce
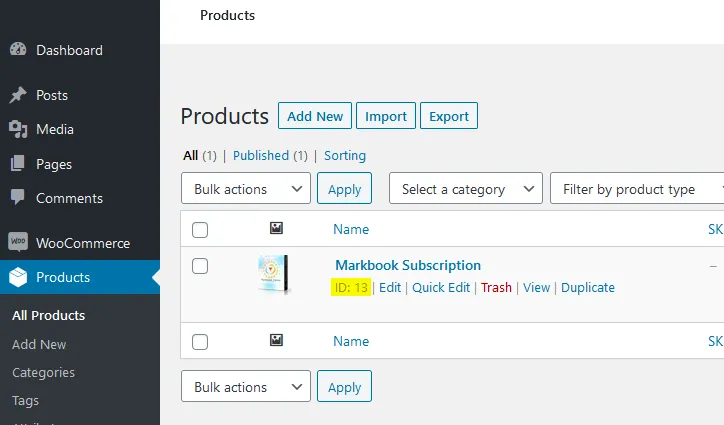
- Dans la page d-administration de WooCommerce, choisissez Products (Produits) et placez le curseur sur le produit d-abonnement souhaité. L-identifiant (ID) s-affichera. Sur la capture d-écran ci-dessous, il s-agirait de 13 :
- Dans le fichier workbooks.json, remplacez “product ID” par l-identifiant de produit que vous avez obtenu. Dans notre cas ci-dessus, nous écririons “13” :
{ "products": { "13": { … "variations": { "variation ID 1": {- Vous pouvez ensuite donner le titre de votre choix à votre classeur. Cela est purement informatif et peut vous aider à vous repérer lorsque vous configurez plusieurs classeurs :
{ "products": { "13": { "title": "My workbook title",- Démarrez Excel, ouvrez votre classeur Excel et XLS Padlock.
Accédez à la page “Activation Keys / Activation Settings”. Cliquez sur le bouton “Copy” situé près du champ “Application Master Key” :
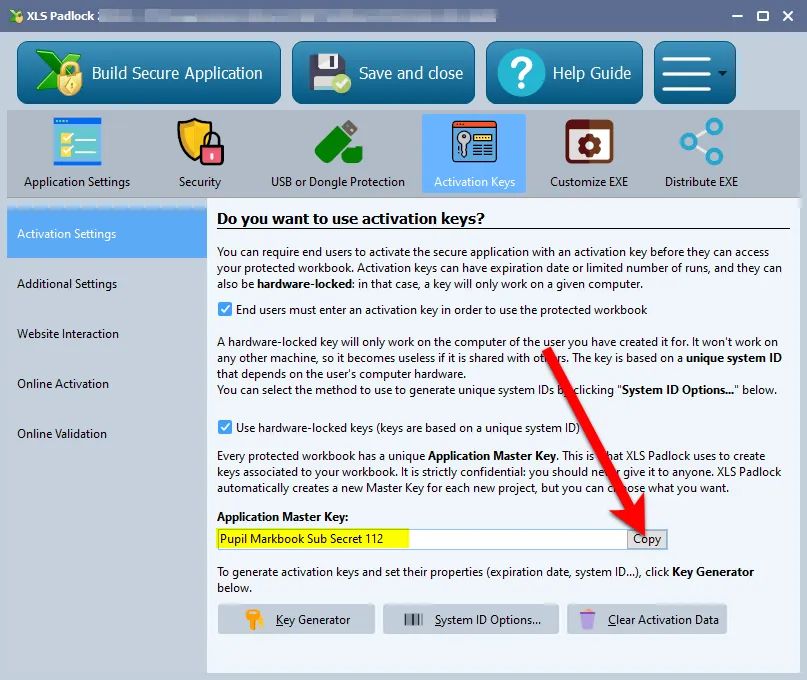
Collez cette valeur dans workbooks.json comme valeur de l-entrée xlspadlockmasterkey. D-après la capture d-écran ci-dessus, cela donnerait :
{ "products": { "13": { "title": "My workbook title", "xlspadlockmasterkey": "Pupil Markbook Sub Secret 112", "variations": {…
- De retour dans XLS Padlock, choisissez Online Activation et cliquez sur le bouton “Copy” situé près du champ “Security Private Key” :
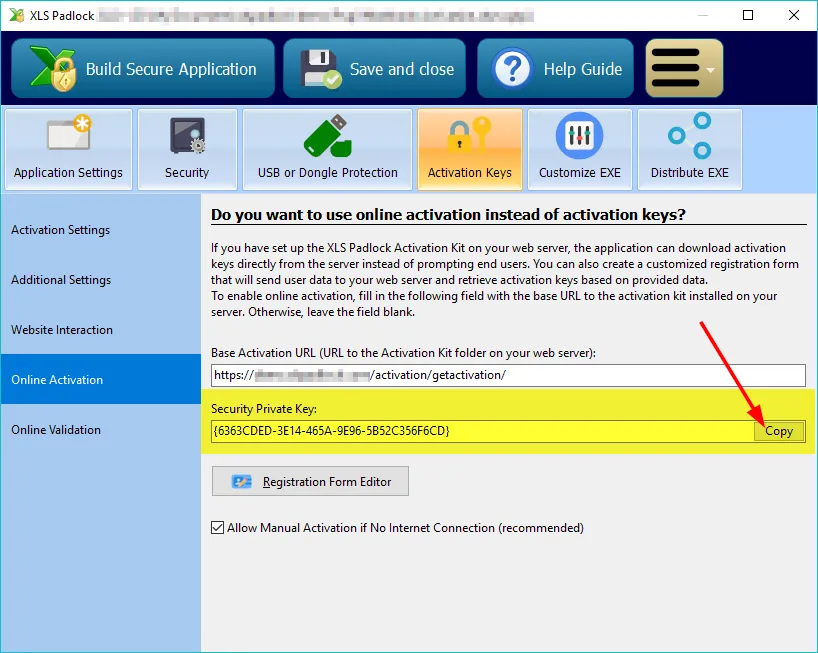
Collez cette valeur dans workbooks.json comme valeur de l-entrée xlspadlockprivatekey. D-après la capture d-écran ci-dessus, cela donnerait :
{ "products": { "31": { "title": "My workbook title", "xlspadlockprivatekey": "{6363CDED-3E14-465A-9E96-5B52C356F6CD}", "xlspadlockmasterkey": "Pupil Markbook Sub Secret 112", "variations": {…
- Nous allons maintenant traiter les variations :
- si votre produit d-abonnement ne contient aucune variation, saisissez “0” comme identifiant de variation.
- Sinon, si vous avez un abonnement variable, vous devrez créer un bloc “variation” pour chaque variation présente dans votre produit et configurer les propriétés correspondantes.
Pour obtenir l-identifiant de variation, dans votre administration WooCommerce, choisissez votre produit dans “Products”. Ensuite, dans “Product Data”, cliquez sur l-onglet “Variations” et les identifiants de variation sont listés après chaque dièse, comme vous pouvez le voir mis en évidence sur la capture d-écran ci-dessous :
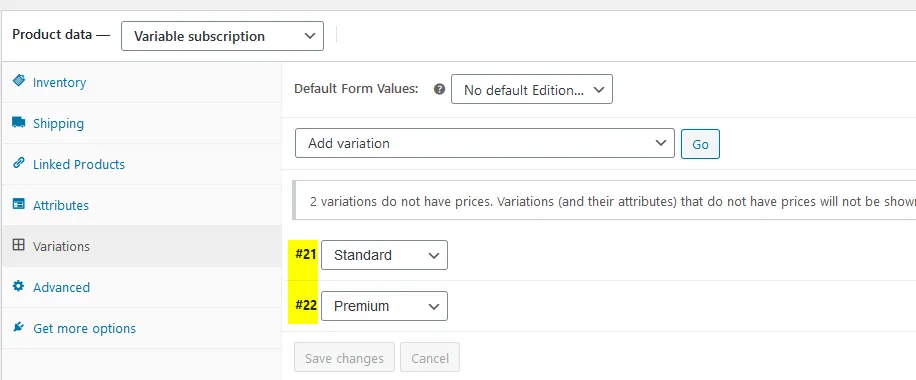
Accédez au fichier workbooks.json et localisez le bloc “variation”. Saisissez votre identifiant de variation pour le premier bloc de variation. Si votre produit d-abonnement n-a aucune variation définie dans WooCommerce, saisissez “0” comme identifiant. Dans notre exemple, nous saisirions 21 comme ci-dessous :
{ "products": { "13": { "title": "My workbook title", "xlspadlockprivatekey": "{6363CDED-3E14-465A-9E96-5B52C356F6CD}", "xlspadlockmasterkey": "Pupil Markbook Sub Secret 112", "variations": { 21: { "usehardwarelocking": 1, "maxactivperorder": 2, "keymaxdays": 180, "shownagscreen": 0 },…- Nous pouvons maintenant configurer les différentes propriétés de cette variation :
- Si vous ne souhaitez pas générer de clés d-activation verrouillées au matériel (NON RECOMMANDÉ), changez l-entrée usehardwarelocking de 1 à 0.
- Définissez le nombre d-activations autorisées par commande grâce à l-entrée maxactivperorder. Cela vous permet de définir sur combien de machines un utilisateur final (par exemple celui qui a acheté votre classeur compilé EXE) peut activer le classeur. Par défaut, il s-agit de la valeur définie dans le config.ini (voir ci-dessus).
Remarque : la quantité commandée est également prise en compte. Par exemple, si le client a acheté une quantité de 2 produits et avec maxactivperorder = 2, nous autoriserions 4 activations.
1. Si vous souhaitez générer des clés d-activation qui afficheraient un écran de rappel (nag screen), utile pour les essais, changez l-entrée **shownagscreen** de 0 à 1.2. Enfin, si vous souhaitez définir une date d-expiration ou un nombre maximum d-exécutions / de jours, c-est possible. N-oubliez pas que XLS Padlock n-autorise qu-un seul mode d-expiration : date, nombre d-exécutions ou nombre de jours par clé d-activation. 1. Pour un nombre maximum d-exécutions, définissez l-entrée nommée "**keymaxruns**" et réglez sa valeur sur le nombre d-exécutions que vous souhaitez autoriser. 2. Pour un nombre maximum de jours, définissez l-entrée nommée "**keymaxdays**" et réglez sa valeur sur le nombre de jours que vous souhaitez autoriser. 3. Pour une date d-expiration fixe, définissez l-entrée nommée "**keyexpiredate**" et réglez sa valeur sur la date au format obligatoire suivant : YYYY/MM/DD10. Répétez les mêmes étapes pour toutes les variations de votre produit. Par exemple, ci-dessous vous pouvez voir que nous avons défini deux variations (une avec une date d-expiration fixe et une autre avec un nombre de jours autorisés) :
{ "products": { "13": { "title": "My workbook title", "xlspadlockprivatekey": "{6363CDED-3E14-465A-9E96-5B52C356F6CD}", "xlspadlockmasterkey": "Pupil Markbook Sub Secret 112", "variations": { 21: { "usehardwarelocking": 1, "maxactivperorder": 2, "keymaxdays": 180, "shownagscreen": 0 }, 22: { "usehardwarelocking": 1, "maxactivperorder": 4, "shownagscreen": 0 }, } …