Configuring the classical product in workbooks.json
The steps are for products which lead to classical orders in WooCommerce. They are not related to subscriptions.
- Edit the workbooks.json file stored on your server.
- If not done, go to the WooCommerce admin page and create the product that will be associated to your workbook. If you do not know how to do that, please see the WooCommerce documentation
- In the WooCommerce admin page, choose Products and place the cursor over the product you want. The ID will be displayed. On the screenshot below, it would be 68:
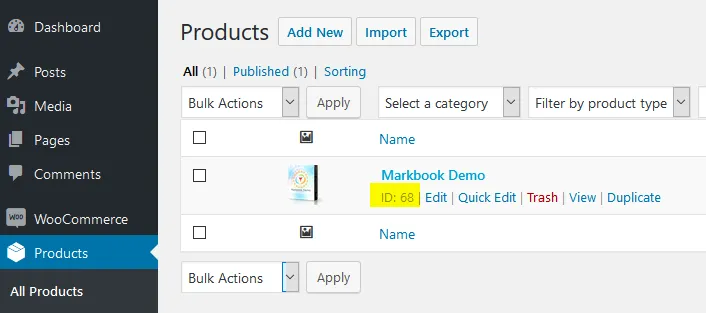
- In the workbooks.json file, replace “product ID” with the product ID you obtained. In our case above, we would write “68”:
{ "products": { "68": { … "variations": { "variation ID 1": {- You can then give the title you want to your workbook. This is purely informative and can be useful to help you navigate when configuring multiple workbooks:
{ "products": { "68": { "title": "My workbook title",- Start Excel, open your Excel workbook and XLS Padlock.
Navigate to the “Activation Keys / Activation Settings” page. Click the “Copy” button near the “Application Master Key” field:
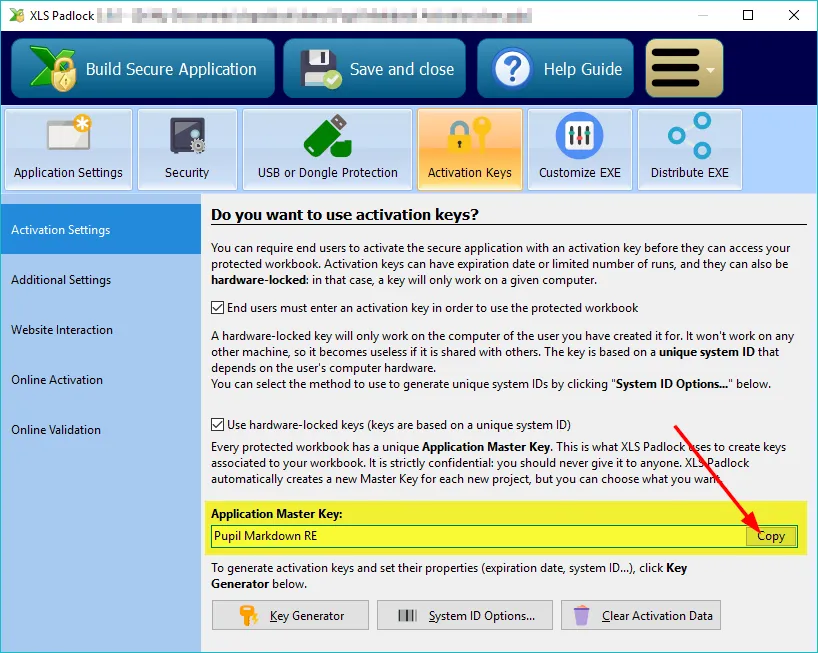
Paste this into workbooks.json for the value of the xlspadlockmasterkey entry. Based on the screenshot above, this would give:
{ "products": { "68": { "title": "My workbook title", "xlspadlockmasterkey": "Pupil Markdown RE", "variations": {…
- Back to XLS Padlock, choose Online Activation and click the “Copy” button near the “Security Private Key” field:
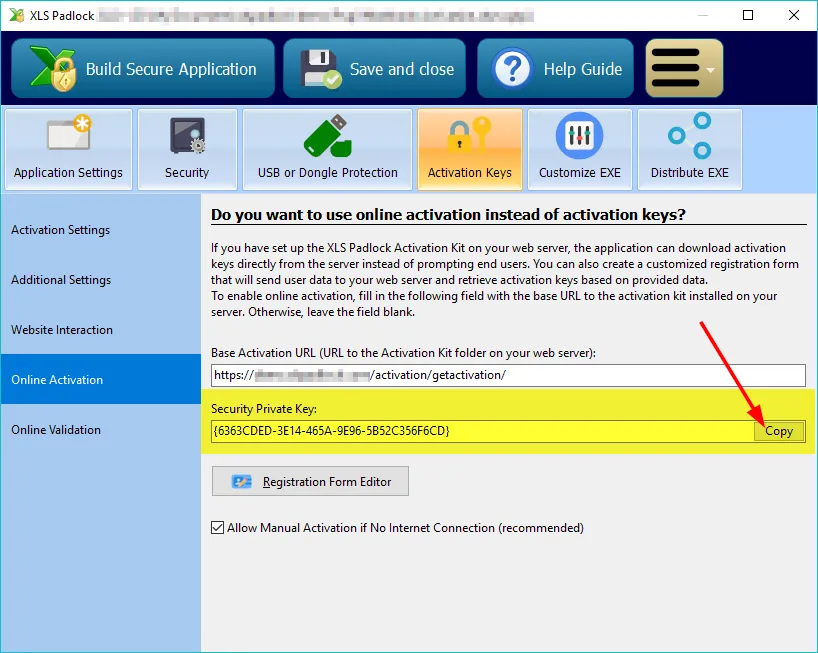
Paste this into workbooks.json for the value of the xlspadlockprivatekey entry. Based on the screenshot above, this would give:
{ "products": { "31": { "title": "My workbook title", "xlspadlockprivatekey": "{6363CDED-3E14-465A-9E96-5B52C356F6CD}", "xlspadlockmasterkey": "Pupil Markdown RE", "variations": {…
- Still on the Online Activation page in XLS Padlock, look at the option “Compatibility mode for pre-2026 activation kits (unsigned line-based protocol)”.
- If it is ticked, your workbook uses the legacy protocol. The xlspadlockprivatekey entry above is all this product needs, and you can go straight to the variations.
- If it is unticked, your workbook uses the 2026 activation protocol, in which the kit signs its answers with an Ed25519 key. That signing key is a different thing from the Security Private Key, and the kit needs it in order to answer this workbook.
To obtain it, click the “Generate keypair…” button on the Online Activation page. XLS Padlock shows the private key once. Paste it into workbooks.json as the value of the xlspadlocksignkey entry for this product:
{ "products": { "31": { "title": "My workbook title", "xlspadlockprivatekey": "{6363CDED-3E14-465A-9E96-5B52C356F6CD}", "xlspadlocksignkey": "your base64 private key", "xlspadlockmasterkey": "Pupil Markdown RE", "variations": {Treat this key exactly as you would an SSL private key. Anyone who holds it can forge activation responses to your customers.
- Now we will deal with the variations:
- if your product does not contain any variations, enter “0” as the variation ID.
- Otherwise, you will have to create a “variation” block for each variation present in your product and configure the corresponding properties.
To obtain the variation ID, in your WooCommerce admin, choose your product in “Products”. Then, in “Product Data”, click the “Variations” tab and the variation ID are listed after each hash, as you can see them highlighted on the screenshot below:
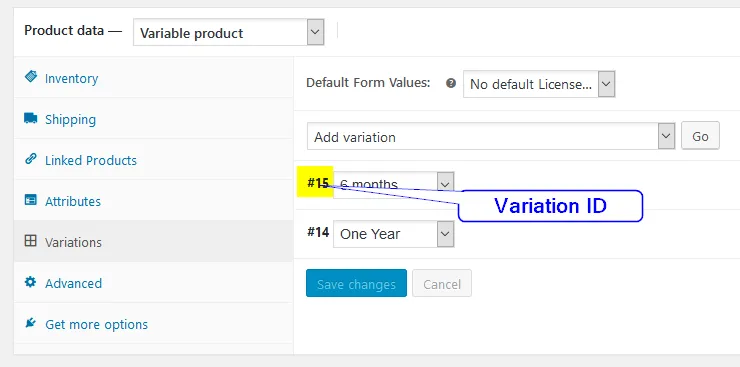
Go to the workbooks.json and locate the “variation” block. Enter your variation ID for the first variation block. If your product has no variation defined in WooCommerce, enter “0” as the ID. In our sample, we would enter 15 as below:
{ "products": { "31": { "title": "My workbook title", "xlspadlockprivatekey": "{6363CDED-3E14-465A-9E96-5B52C356F6CD}", "xlspadlockmasterkey": "Pupil Markdown RE", "variations": { 15: { "usehardwarelocking": 1, "maxactivperorder": 2, "keymaxdays": 180, "shownagscreen": 0 },…- Now we can configure the different properties for that variation:
- If you do not want to generate hardware-locked activation keys (NOT RECOMMENDED), change the usehardwarelocking entry from 1 to 0.
- Define the number of activations per order allowed thanks to the maxactivperorder entry. This lets you define on how many machines an end user (for instance who purchased your compiled workbook EXE) can activate the workbook. By default, it’s the value defined in the config.ini.
Note: the order quantity is also taken into account. For instance, if the customer bought a quantity of 2 products and with maxactivperorder = 2, we would allow 4 activations.
1. If you want to generate activation keys that would display a nag screen (useful for trials), change the **shownagscreen** entry from 0 to 1.2. Finally, if you want to set an expiration date or maximum number of runs / days, it is possible. **Remember that XLS Padlock only allows one expiration mode**: date, number of runs or number of days per activation key. 1. For a maximum number of runs, define the entry named “**keymaxruns**” and set its value to the number of runs you want to allow. 2. For a maximum number of days, define the entry named “**keymaxdays**” and set its value to the number of days you want to allow. 3. For a fixed expiration date, define the entry named “**keyexpiredate**” and set its value to the date with the following mandatory format: YYYY/MM/DD11. Repeat the same steps for all variations in your product. For instance, below you can see that we defined two variations (one with a fixed expiration date and another with a number of allowed days):
{ "products": { "31": { "title": "My workbook title", "xlspadlockprivatekey": "{6363CDED-3E14-465A-9E96-5B52C356F6CD}", "xlspadlockmasterkey": "Pupil Markdown RE", "variations": { 15: { "usehardwarelocking": 1, "maxactivperorder": 2, "keymaxdays": 180, "shownagscreen": 0 }, 16: { "usehardwarelocking": 1, "maxactivperorder": 1, "keyexpiredate": "2020/10/04", "shownagscreen": 1 }, } …