Step 4: associate your compiled workbook EXE files
The FS Subscription kit was designed to support multiple Excel workbooks at once. So, you must install the kit only once on your server even to manage multiple workbooks.
All the parameters of your Excel workbooks must be configured in a file called workbooks.json in JSON format.
You will find a template of the file in the “inc” directory of the application. We will see how to configure it in the following steps.
- Navigate to the “inc” subfolder and edit the workbooks.json file stored on your server.
Once again, check that the workbooks.json file cannot be accessed publicly (the .htaccess prevents end users from accessing it) because this file contains sensitive data for generating activation keys!
- Here is the content of the workbooks.json file:
{ "products": { "product-path": { "title": "Your workbook 1 title", "xlspadlocksignkey": "Your workbook 1 base64 Ed25519 secret key - 2026 protocol", "xlspadlockprivatekey": "{Your workbook 1 security GUID - legacy pre-2026}", "xlspadlockmasterkey": "Your workbook 1 master key", "usehardwarelocking": 1, "maxactivperorder": 2, "keymaxdays": 180, "shownagscreen": 0 }, "just-demo": { "title": "Just a demo, remove me in production", "xlspadlocksignkey": "", "xlspadlockprivatekey": "{6363CDED-4E14-412A-8196-5A52C356D6CD}", "xlspadlockmasterkey": "14JFGDBFG784GKLGSJSG121QSFB", "usehardwarelocking": 1, "maxactivperorder": 2, "shownagscreen": 0 } }}“products” is a mandatory section. Do not change the value. The schema used is the following:
{ "products": { "product-path": { …If not already done, go to the FastSpring dashboard and create the subscription product that will be associated to your workbook. If you do not know how to do that, please see the documentation at https://fastspring.com/docs/subscriptions-overview/
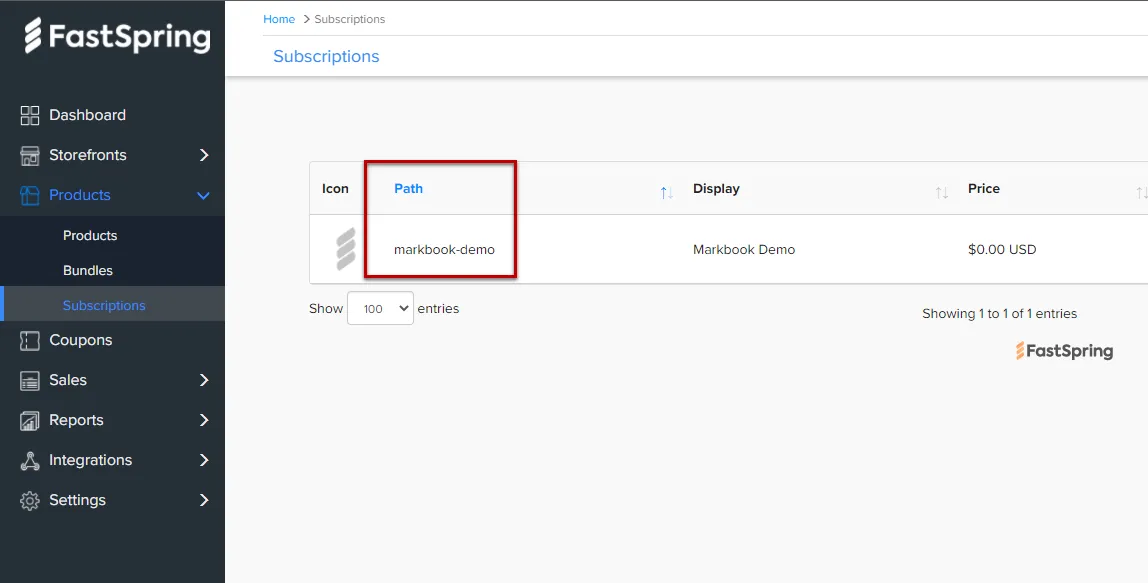
- Choose Products then Subscriptions. The product path will be displayed. On the screenshot below, it would be marbook-demo:
- In the workbooks.json file, replace “product-path” with the product path defined in the FastSpring Dashboard. In our case above, we would write “markbook-demo”:
{ "products": { "markbook-demo": { …- You can then give the title you want to your workbook. This is purely informative and can be useful to help you navigate when configuring multiple workbooks:
{ "products": { "markbook-demo": { "title": "My workbook title",- Start Excel, open your Excel workbook and XLS Padlock.
Navigate to the “Activation Keys / Activation Settings” page. Click the “Copy” button near the “Application Master Key” field:
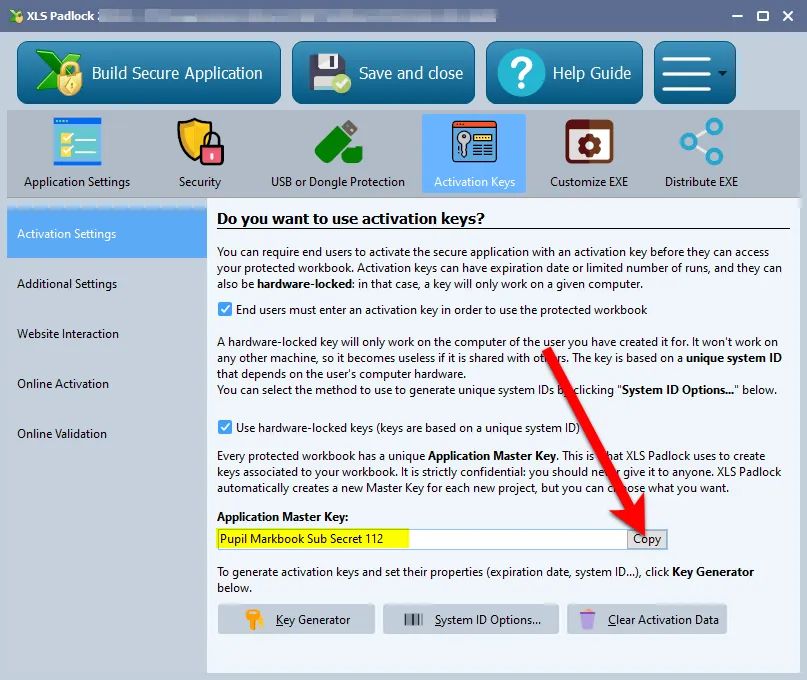
Paste this into workbooks.json for the value of the xlspadlockmasterkey entry. Based on the screenshot above, this would give:
{    "products": {        "markbook-demo": {            "title": "My workbook title",            "xlspadlockmasterkey": "Pupil Markbook Sub Secret 112",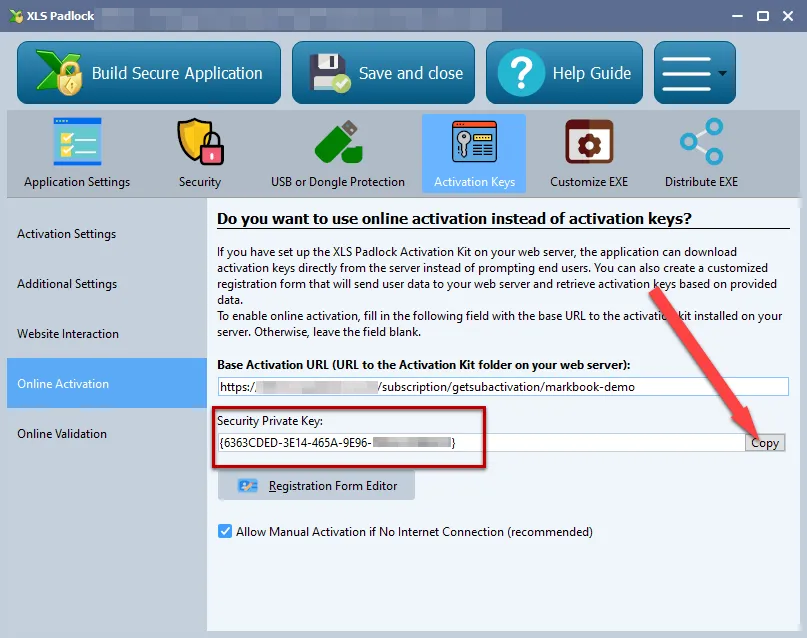
…- Back to XLS Padlock, choose Online Activation and set up the signing key for this product. With the 2026 signed protocol (recommended), leave “Compatibility mode for pre-2026 activation kits” unchecked, click “Generate keypair…”, and copy the displayed private (secret) key into the xlspadlocksignkey entry. See The 2026 activation protocol for the full procedure.
Based on the screenshot above, this would give:
{ "products": { "markbook-demo": { "title": "My workbook title", "xlspadlocksignkey": "VGhpcyBpcyBhIHNhbXBsZSBiYXNlNjQgRWQyNTUxOSBzZWNyZXQ=", "xlspadlockmasterkey": "Pupil Markbook Sub Secret 112",…
- Now we can configure the different properties for that variation:
- If you do not want to generate hardware-locked activation keys (NOT RECOMMENDED), change the usehardwarelocking entry from 1 to 0.
- Define the number of activations per order allowed thanks to the maxactivperorder entry. This lets you define on how many machines an end user (for instance who purchased your compiled workbook EXE) can activate the workbook. By default, it’s the value defined in the config.ini (see above).
Note: the order quantity is also taken in account. For instance, if the customer bought a quantity of 2 products and with maxactivperorder = 2, we would allow 4 activations.
1. If you want to generate activation keys that would display a nag screen (useful for trials), change the **shownagscreen** entry from 0 to 1.2. Finally, if you want to set an expiration date or maximum number of runs / days, it’s possible. Remember that XLS Padlock only allows one expiration mode: date, number of runs or number of days per activation key. 1. For a maximum number of runs, define the entry named “**keymaxruns**” and set its value to the number of runs you want to allow. 2. For a maximum number of days, define the entry named “**keymaxdays**” and set its value to the number of days you want to allow. 3. For a fixed expiration date, define the entry named “**keyexpiredate**” and set its value to the date with the following mandatory format: YYYY/MM/DD{ "products": { "markbook-demo": { "title": "Your workbook title", "xlspadlocksignkey": "VGhpcyBpcyBhIHNhbXBsZSBiYXNlNjQgRWQyNTUxOSBzZWNyZXQ=", "xlspadlockmasterkey": "Pupil Markbook Sub Secret 112", "usehardwarelocking": 1, "maxactivperorder": 2, "keymaxdays": 180, "shownagscreen": 0 }, …