Step 2: configure config.ini
- Navigate to the “inc” subfolder (xlspadlock-onlineact / inc) and edit the config.ini file stored on your server.
The important part of the config.ini file looks like this:
[globals]
; ====== Modify the following parameters for your workbook ======
; ** Your XLS Padlock user ID - must begin with xps- **
xlspadlockuserid = "xps-45151454"
; ** Master key of your workbook **
; Set the Application Master Key, as defined in your XLS Padlock project. This master key is used to generate the activation key.
; It is strictly confidential: do not share it with anyone
xlspadlockmasterkey = "FE9958CACCA8E446178AB997D"
; ** Security private key of your workbook **
; Used to be sure that another application can't use this online webapp to generate its keys.
xlspadlockpkey = "{FE0F8E30-1E17-4E01-91BA-D0EED421C834}"
; ** Key parameters **
usehardwarelocking = 1
; xlspadlocksignkey= (2026 protocol - see the Ed25519 section below)-
Change the value of the entry named xlspadlockuserid to your XLS Padlock user ID. This user ID is available in the registration email that you received when you purchased XLS Padlock.
-
Start Excel, open your Excel workbook and launch XLS Padlock. Navigate to the “Activation Keys / Activation Settings” page:
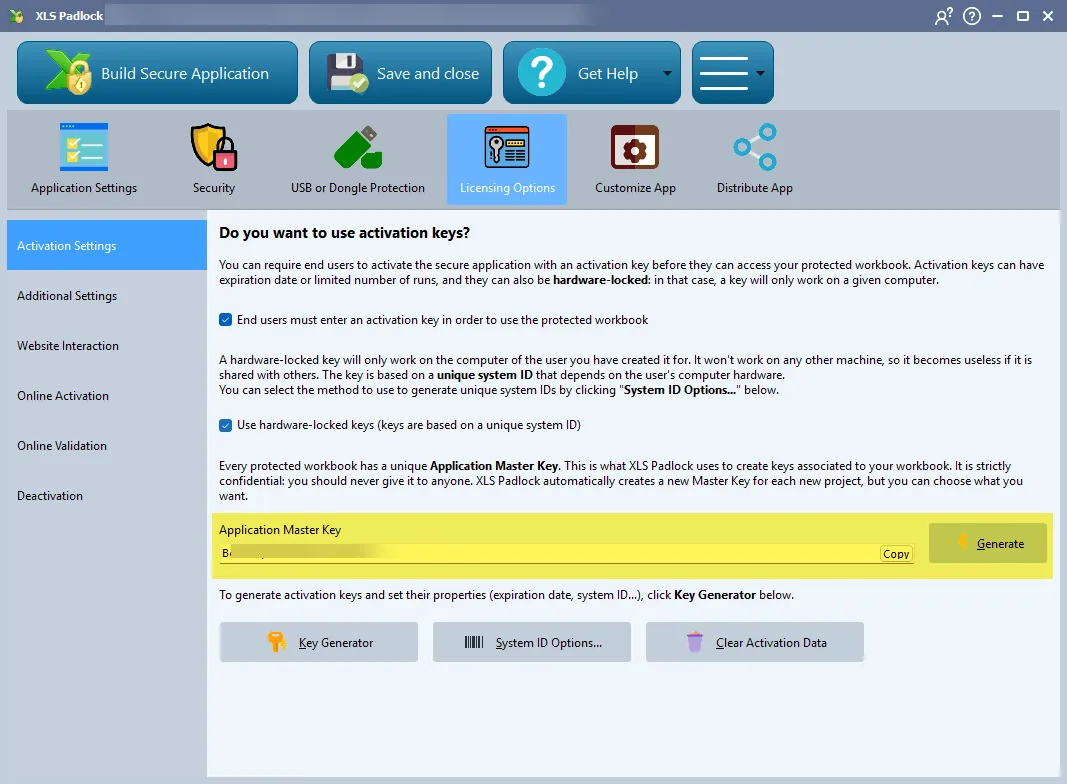
Click the “Copy” button attached to the “Application Master Key” field.
Paste this into config.ini for the value of the xlspadlockmasterkey entry. Based on the screenshot above, this would give:
xlspadlockmasterkey = "Markbook Test484"- In XLS Padlock, choose Online Activation:
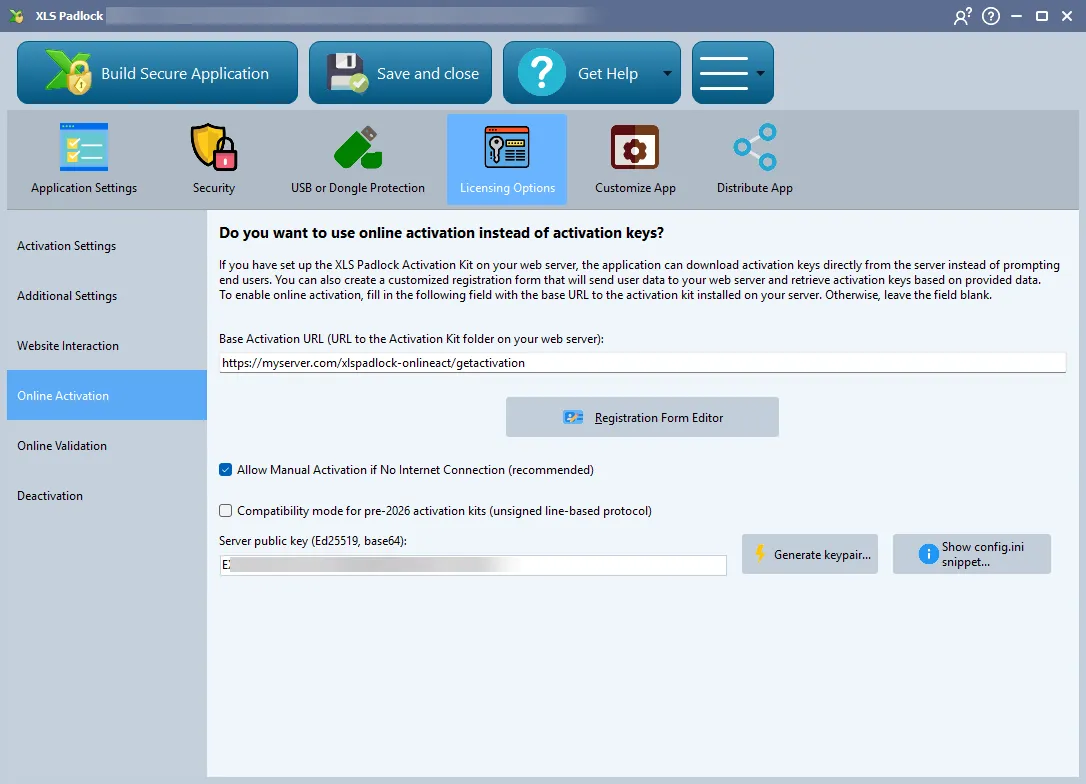
For the 2026 signed protocol, leave “Compatibility mode for pre-2026 activation kits” unchecked and set up the Ed25519 keypair as described in the 2026 protocol section below. In that mode the legacy Security Private Key field is hidden and the xlspadlockpkey entry is ignored.
If you enable compatibility mode instead, click Copy on the Security Private Key field and paste it into the xlspadlockpkey entry.
- If you do not want to generate hardware-locked activation keys, change the last entry to 0:
usehardwarelocking = 0- Save modifications to the config.ini file.
XLS Padlock 2026 protocol: Ed25519 response signing
Section titled “XLS Padlock 2026 protocol: Ed25519 response signing”Starting with XLS Padlock 2026.0, the Designer offers a new activation protocol based on JSON request/response envelopes with mandatory Ed25519 signature verification. The kit auto-detects the protocol per request, so workbooks packed in the legacy “compatibility mode” keep working unchanged.
To enable the 2026 protocol:
- In the XLS Padlock Designer, open the Online Activation page.
- Uncheck “Compatibility mode for pre-2026 activation kits”.
- Click “Generate keypair…”. The Server Public Key field is read-only and fills automatically; copy the displayed private key into
config.iniunderxlspadlocksignkey. The keypair must be generated from the Designer, since the public key cannot be entered by hand. - Re-pack your protected workbook.
; --- XLS Padlock 2026 protocol - Ed25519 response signing ---; Required when the workbook was packed with "Compatibility mode for; pre-2026 activation kits" UNCHECKED in the Designer.xlspadlocksignkey=